Short answer
To make a transparent PNG, remove everything around the subject so those pixels become empty, then save as PNG (never JPG). From a photo, the quickest way is a one-click background remover. In a free editor such as GIMP, add an alpha channel, select the background, delete it and export as PNG. For a flat logo on white, use Colors > Color to Alpha in GIMP to turn the white transparent.
To make a transparent PNG, two things have to happen: the background has to become empty pixels, and the file has to be saved in a format that can store empty pixels. Most failed attempts get one right and the other wrong. The background is deleted but the layer had no transparency, so it turns white; or the cutout is perfect and then gets saved as a JPG.
There are three good ways to do the first part, and which one fits depends on what you start with. A photo of a person, pet or product needs its subject found and cut out. A flat logo or drawing on white only needs one colour made transparent. A picture you are designing yourself only needs its background hidden before export. This guide covers all three, with the export and a test at the end. If you are not sure what transparency is inside the file, what a transparent background is explains it in a few minutes.
Before you start: which way fits your picture
| You have | The job | Best way | Time |
|---|---|---|---|
| A photo of a person, animal or product | find the subject, remove everything else | one-click background remover | seconds |
| A photo where you need exact control | draw or refine the selection by hand | an editor with alpha (GIMP, Photopea, Photoshop) | 5 minutes to an hour |
| A flat logo, signature or drawing on white | make one colour transparent | Color to Alpha, or a vector trace | a minute |
| A design, illustration or slide you made | hide the background layer | export settings of your app | a minute |
The time for the manual route depends almost entirely on the edge. A box on a table takes five minutes; a person with loose hair can take an hour and still look cut out.
Way 1: a one-click background remover, for photos
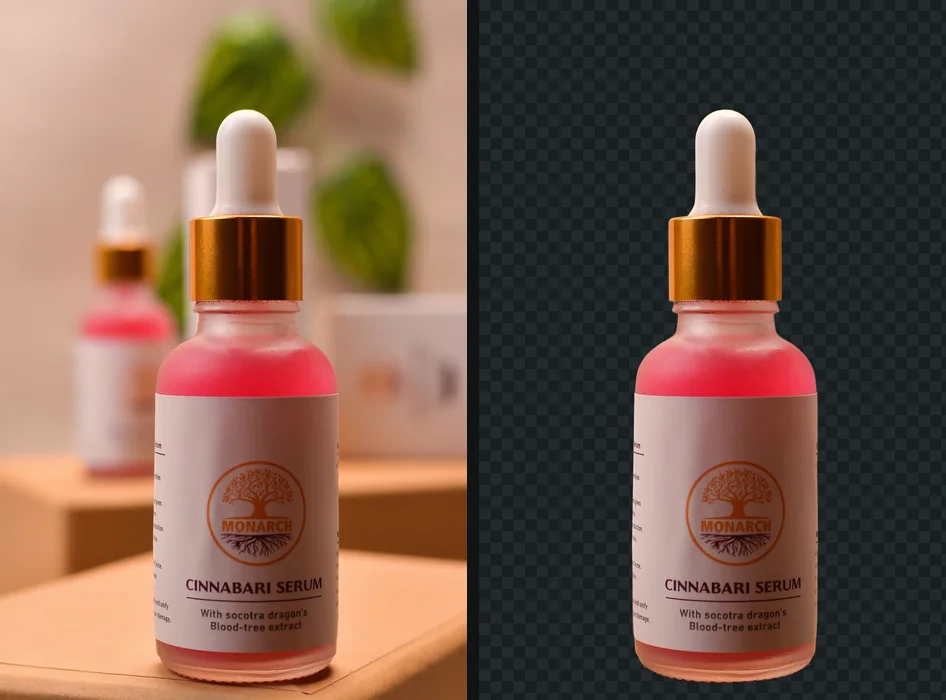
A background remover uses an AI model trained to separate the subject of a photo from its surroundings. You give it the photo, it gives back the subject with alpha set to zero everywhere else and partial alpha along soft edges.
- Open the remover and drop in the photo.
- Wait for the cutout. Usually a few seconds.
- Inspect the edge. Zoom in on hair, fingers, gaps between arms and body, and anything thin such as a strap or a plant stem. Compare with the original if the tool lets you.
- Adjust if the tool allows it. Common controls shrink or grow the outline slightly, or soften it.
- Download as PNG. Not JPG, and check the size of what you download: some removers give a reduced-size file for free and charge for the full resolution.
Where the cutout runs matters. Many removers are websites that upload your photo and process it on their servers; some apps do it on the device. For a product photo that may be fine; for pictures of people, it is worth checking. Is it safe to upload photos online summarises what the popular services’ policies say, and how to check a website is not uploading your photos shows how to see it for yourself.
On an iPhone or iPad, the Photos app can lift a subject: touch and hold it, then copy or share it. Removing a background on iPhone covers that route and its limits.
The free way
The one-click way, without uploading
Drop a photo on getPNG and download a transparent PNG at the full resolution of the original. The AI finds the subject on your device, then the edge is refined against the full-size photo, so hair keeps its soft edge instead of a blurry, enlarged outline. Edge shift grows or shrinks the outline by up to five pixels and Feather softens it, both instantly; the compare view puts the original beside the cutout. Free, no account, no watermark, and it also saves WebP with transparency.
When a one-click cutout is not enough
AI removers decide what the subject is. In a group photo, a product with a hand holding it, or a scene where you want to keep a chair, it may keep too much or too little, and a remover without a brush cannot be told otherwise. They also struggle where the subject and background are the same colour, and with transparent objects like glass, which should be partly see-through. In those cases, take the cutout into an editor and fix the area by hand, or use Way 2 from the start.
Way 2: an image editor with transparency, for control
Any editor with layers and an alpha channel can make a transparent PNG by hand. GIMP is free and runs on Windows, macOS and Linux, so the steps below use GIMP 3.0 (menus checked against the GIMP 3.0 documentation in September 2026). Photopea and Photoshop work the same way with different menu names; removing a background in GIMP and in Photoshop have the full versions.
- Open the photo with File > Open.
- Add an alpha channel. Layer > Transparency > Add Alpha Channel. A JPG opens without one, and in the Layers dialog a layer with no alpha channel has its name in bold. Without alpha, anything you delete is filled with the background colour instead of becoming transparent. This is the step most people miss.
- Select the background or the subject. For a plain background, the Fuzzy Select tool (U) selects a connected area of similar colour where you click; hold Shift and click to add more areas. For a subject on a busy background, Foreground Select or the Paths tool lets you mark the subject instead.
- Invert if needed. If you selected the subject, Select > Invert, so the background is selected.
- Soften the edge slightly. Select > Feather by one or two pixels, so the edge fades instead of stepping.
- Delete. Press Delete. The background turns into GIMP’s checkerboard.
- Remove the rest. Zoom in and deal with leftovers with the Eraser, which also erases to transparency on a layer with alpha.
- Export as PNG. File > Export As, give the file a name ending in
.png, and export. Saving with File > Save makes a GIMP.xcfproject, not a PNG.
A manual cutout is as good as the selection. Hard objects with clear outlines come out cleanly. Hair, fur and motion blur are where hand selection gets slow, because the edge is a zone of mixed pixels and a selection wants a line.
Way 3: from a logo, signature or drawing on white
A flat logo on a white background is a different problem from a photo. There is no subject to find, only one colour to remove, and the edges are anti-aliased: a thin band of pixels that are part ink, part white. Deleting the white with a magic wand leaves that band behind as a pale fringe, which shows on any dark background.
The better tool turns a colour into transparency in proportion. In GIMP 3.0:
- Open the logo and add an alpha channel (Layer > Transparency > Add Alpha Channel).
- Choose Colors > Color to Alpha. The colour defaults to white; if the background is off-white, pick it with the eyedropper.
- Adjust the thresholds if the edge looks too heavy or too thin. The Transparency threshold sets how close a colour must be to white to disappear completely; the Opacity threshold sets how different it must be to stay fully solid. Everything in between becomes partly transparent.
- Click OK and export as PNG.
Pale grey edge pixels become ink at partial alpha, so the logo sits cleanly on dark colours. Be aware that Color to Alpha also makes light parts inside the logo partly transparent, such as a light grey element or white lettering inside a dark shape. Select the background area first if the logo contains white that must stay white.
If the logo is a photo (on paper, a wall, a T-shirt), lighting and texture mean there is no single background colour, so start with Way 1. A logo photo to a transparent PNG covers that case. And if the logo will be printed or used at large sizes, a PNG is the wrong end point: trace it into a vector instead. getSVG’s PNG to SVG does that in the browser, and its guide on turning a signature into a transparent PNG covers handwriting specifically.
Also: a design you made yourself
If the picture was created in a design app, it may already be transparent under the surface, and only the export decides. The background is usually a layer or a fill you can switch off:
- In Procreate, untick the Background color layer before exporting as PNG.
- In Figma, untick Show in exports on the frame’s fill.
- In Photoshop and GIMP, hide or delete the background layer.
- In Canva, a transparent background download is part of Canva Pro; see removing a background in Canva.
Save it right: PNG, not JPG
Whatever route you take, the format decides whether the transparency survives. PNG stores full alpha and every pixel exactly. WebP with transparency is much smaller and fine for web pages. JPG has no alpha channel at all, in any version, so any app saving to JPG has to fill the empty area with a colour.
Watch out for these on the way out:
- Export dialogs that default to JPG, especially on phones and in “Save for web” presets.
- A background colour option in some PNG export dialogs, which stores a suggested background colour that some viewers show instead of transparency.
- Resizing afterwards in a tool that does not handle alpha, which can darken or lighten the edge.
- Sharing through chat apps and social networks, which often convert pictures to JPEG. Send the PNG as a file or document instead.
Check the result
Confirm the PNG is really transparent
- Drag the PNG file into a new browser tab.
- Insert the same file on a slide or document with a dark background colour.
- Zoom in on the edge of the subject in both.
You should see: the page or slide colour reaches right up to the subject, with no rectangle, and the edge blends smoothly with no light or dark outline.
If you do not: a white or black box means the file has no transparency: check for a missing alpha channel, a visible background layer or a JPG export. A grid means a checkerboard was painted in. A pale rim means colour from the old background is still in the edge pixels; see white halos after a cutout.
When it still does not work
- The picture looks transparent in the editor and white everywhere else. The export was JPG, or a background layer or fill was included. Export again as PNG with the background hidden.
- It is transparent on your computer and black on a phone or in a message. The file is fine; the app you sent it through flattened it. Why a PNG shows a black or white background lists the usual suspects.
- The downloaded “transparent PNG” has a checkerboard. It was painted into the pixels. The fake transparent PNG explains how to fix it.
- The edges look jagged or haloed. The selection was hard, or it kept background colour in the edge. Feather slightly, shrink the selection by a pixel, or start from an AI cutout with soft alpha.
For the overview of where transparent PNGs work and where they get flattened, see the transparent PNG guide.
The steps, in short
- Decide what you are starting from. A photo with a subject needs a cutout; a flat logo or drawing on white only needs the white made transparent; a design only needs its background layer hidden.
- Make sure the image can hold transparency. In an editor, give the layer an alpha channel (in GIMP: Layer > Transparency > Add Alpha Channel), or deleted pixels turn into the background colour.
- Remove the background. Use a background remover for photos, a selection and Delete in an editor, or Color to Alpha for a single flat colour.
- Check the edge. Zoom to 200 percent over a dark and a light colour and look for a pale rim, jagged steps or missing detail.
- Save or export as PNG. Choose PNG (or WebP) as the format. JPG cannot store transparency and fills the empty area with a colour.
- Test the file on a coloured page. Drag the PNG into a browser tab or onto a dark slide. A real transparent PNG shows the colour behind it with no box.
Questions
How do I make a PNG transparent for free?
Use a free background remover for a photo, or a free editor such as GIMP or Photopea for a manual cutout. In GIMP, add an alpha channel, select the background with Fuzzy Select or Select by Color, press Delete and export as PNG. For a logo on white, Colors > Color to Alpha does it in one step.
Why is my PNG not transparent after I deleted the background?
Either the layer had no alpha channel, so the editor filled the deleted area with the background colour, or the file was exported as JPG, or a background layer stayed visible. Add an alpha channel, hide or delete any background layer, and export as PNG.
Can I make a JPG into a transparent PNG?
Yes, but converting the format alone does nothing: a JPG saved as PNG still has its background. The background has to be removed and then the result saved as PNG. The JPG's compression marks stay in the picture, which can leave a speckled edge on logos.
How do I make a transparent PNG on a phone?
On an iPhone or iPad, touch and hold the subject in Photos to lift it, then paste it into an app that keeps transparency or save it to Files. On any phone, a browser-based background remover works too; check whether it uploads the photo.
What is the best way to make a logo transparent?
If the logo is flat colour on white, Color to Alpha in GIMP makes the white transparent and keeps the anti-aliased edge soft. If it is a photo of a logo on paper or a wall, cut it out first. For printing or any large size, trace it into a vector (SVG) instead of keeping it as a PNG.