Short answer
To remove a background in GIMP, first add transparency with Layer > Transparency > Add Alpha Channel. For a plain backdrop, click it with Fuzzy Select (key U) and press Delete. For a photo of a person or object, use Foreground Select: outline the subject, paint over it, confirm, then Select > Invert and delete. Export with File > Export As and a .png name. GIMP has no one-click subject detection, so hair takes patience.
To remove a background in GIMP you do three things: give the layer somewhere to store transparency, select what you want gone, and export a PNG rather than saving a GIMP file. None of it is hard, but GIMP does not guess the subject for you the way newer apps do, so the choice of selection tool decides whether this takes two minutes or forty. This guide shows which tool suits which picture, the steps for each, and the handful of settings that make the difference between a clean cutout and a white box.
The steps were checked in GIMP 3.2 (the current release is 3.2.6, from 10 September 2026) against the official GIMP 3.0 manual on 16 September 2026. The tools and menus below are the same in 3.0. If you still run GIMP 2.10, the menu names are almost identical, but the interface looks older and a few dialogs differ.
GIMP is a desktop program, so everything in this guide happens on your own computer. Nothing about the photo is uploaded.
Which GIMP tool should you use to remove a background?
Start by looking at the background, not the subject. The background decides the tool.
| The picture | Best tool | Why |
|---|---|---|
| Product or logo on a plain, even colour | Fuzzy Select | One click grabs the whole backdrop |
| Background colour shows through gaps (a bike wheel, a fence) | Select by Color | Finds every patch of that colour, connected or not |
| Person, pet or object on a busy background | Foreground Select | Works out the edge from rough marks, including soft edges |
| Hard-edged object (a phone, a box, a bottle) | Paths | A drawn outline is cleaner than any automatic edge |
| Black logo or signature on white paper | Colors > Color to Alpha | Turns white into transparency and keeps anti-aliasing |
Most people searching for this have a photo of a person or a product on something messy, which is Foreground Select. If your backdrop is a sheet of paper or a studio sweep, Fuzzy Select is far quicker, so read that section first.
Step 1: Add an alpha channel
Open the photo with File > Open. Then choose Layer > Transparency > Add Alpha Channel.
This is the step most people miss, and it causes the most common complaint: “I deleted the background and it turned white.” A JPG has no transparency, so when GIMP opens one, the layer has no alpha channel. Deleting pixels on such a layer cannot make them transparent, so GIMP fills them with the current background colour instead. Adding the alpha channel gives every pixel a fourth value, its opacity, and deleted pixels then become fully transparent. The alpha channel guide explains that fourth value properly.
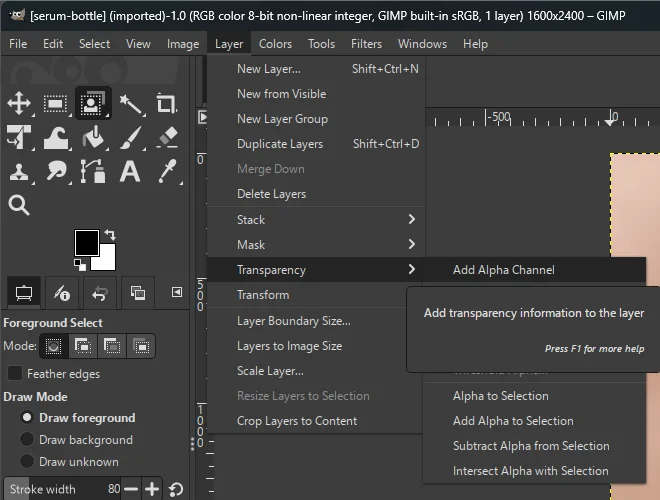
You can tell whether a layer has alpha at a glance: in the Layers dialog, a layer without an alpha channel has its name in bold. If the menu item is greyed out, the layer already has one.
One more check if the picture came from a GIF or an old PNG: look at Image > Mode. If it says Indexed, switch to RGB. Indexed images can only store pixels that are either fully see-through or fully solid, which turns a soft edge into a jagged one.
Method 1: Foreground Select, for people, pets and products
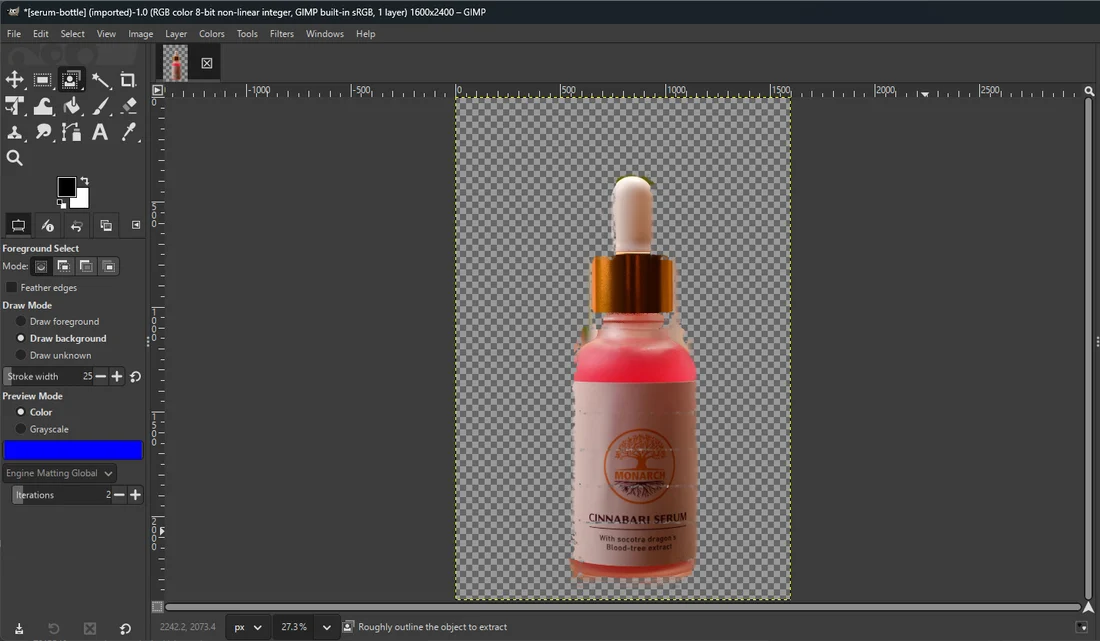
Foreground Select is GIMP’s best tool for photographs. You tell it roughly where the subject is, and it calculates the edge, including pixels that should be partly transparent, like the fuzz of a jumper or loose hair.
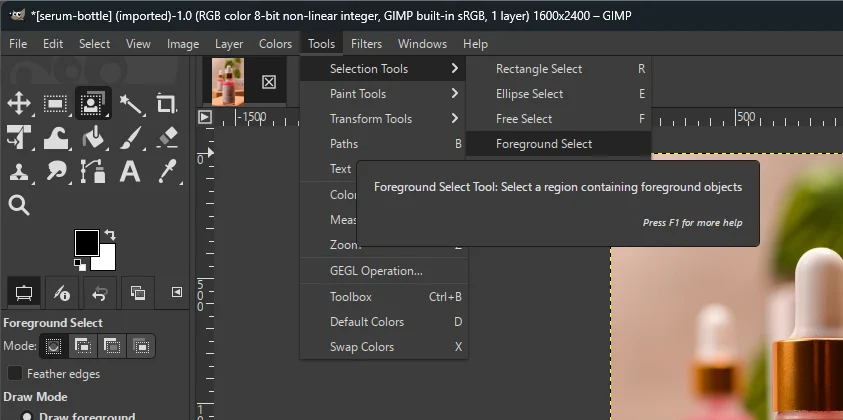
- Choose the tool. Use Tools > Selection Tools > Foreground Select. It has no default keyboard shortcut, so the menu or the toolbox icon is the way in.
- Draw a rough outline. Click around the subject, a little outside its edge, the same way you would with Free Select. Include some background all the way round. Close the outline by clicking the first point, or double-click.
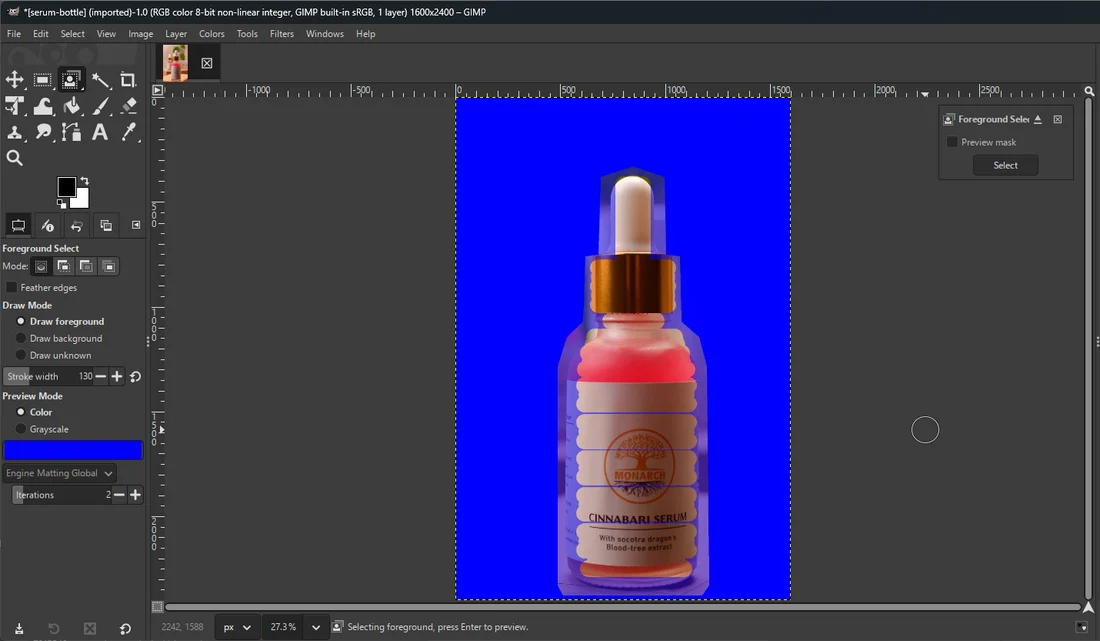
- Press Enter. The picture turns dark blue outside your outline. Everything outside is now marked as definitely background; everything inside is unknown.
- Paint over the subject. With the draw mode set to foreground in Tool Options, paint strokes through the subject. On a clear subject against a plain background, a few confident strokes through the body, the face and each limb are enough. When the subject shares colours with the background, as a pale label does with a pale wall, paint most of the inside: whatever you leave unpainted, GIMP decides for itself, and it can punch holes in text and flat areas. Set Stroke width so the brush is thick but stays inside the subject.
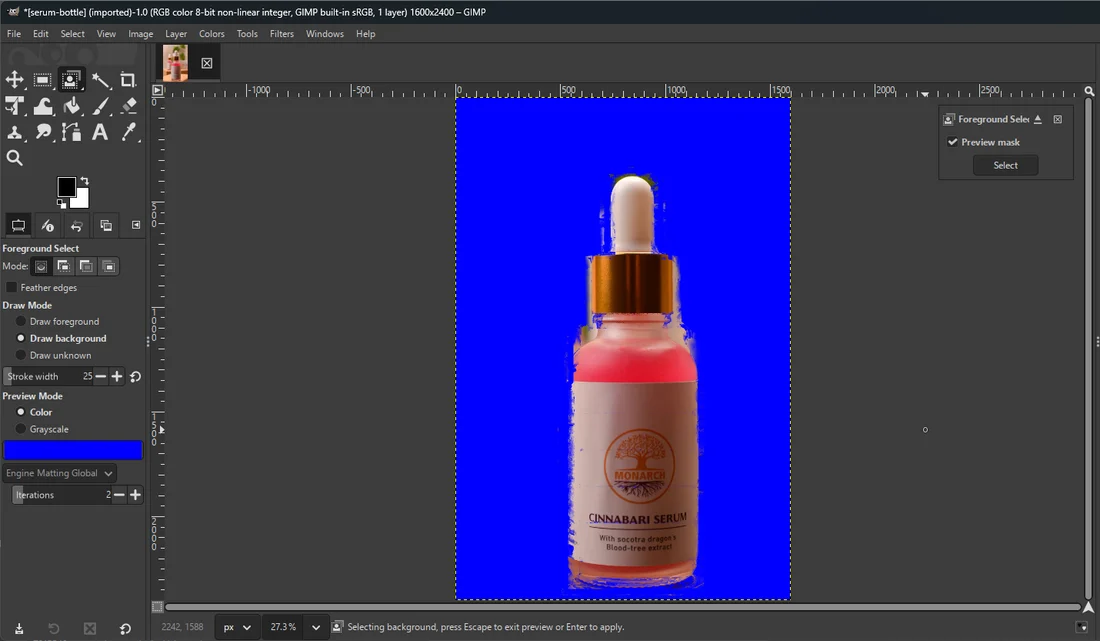
- Preview the result. Turn on the preview in the small box that appears on the canvas. Look at the edges, not the middle.
- Correct it. Where background is still included, switch the draw mode to background and paint over it. Where the tool is unsure, typically hair, switch to unknown and paint along that zone, so GIMP calculates partial transparency there instead of choosing all or nothing.
- Confirm. Press Enter again, or click Select. You now have a normal selection around the subject.
- Remove the background. Choose Select > Invert (Ctrl+I) so the background is selected, then press Delete. A checkerboard appears where the background was: that pattern is how GIMP displays transparency, not part of the picture.
Engine settings, and why the tool can feel slow
In Tool Options, Engine offers Matting Global (the default in GIMP 3.2.6, checked 16 September 2026) and Matting Levin. Levin is slower and often better at fine edges; Global is faster. On a 24-megapixel photo, Levin can take a noticeable time on every preview. If GIMP seems to hang, switch to Global for the rough passes, or work on a copy scaled down with Image > Scale Image to see whether the method suits the picture before committing.
Preview Mode can be Color or Grayscale. Grayscale shows the mask as white (kept), black (removed) and grey (partly transparent), which makes a stray hole in the subject much easier to spot.
Use a layer mask instead of deleting
Deleting is permanent once you close the file. A layer mask does the same job reversibly. After step 7, instead of inverting and deleting, choose Layer > Mask > Add Layer Masks and set Initialize Layer Mask to to Selection. The background disappears, but the pixels are still there, hidden by the mask.
Now you can fix mistakes with a brush: click the mask thumbnail in the Layers dialog, paint black to hide, white to reveal, grey for partly see-through. GIMP 3.2 added an Edit Mask Immediately checkbox to this dialog, which selects the mask for you as soon as it is created. When you are happy, export as PNG; there is no need to apply the mask first.
Method 2: Fuzzy Select, for plain backgrounds
If the subject stands on a wall, a sheet or a studio backdrop of one even colour, you do not need Foreground Select at all.
- Choose Fuzzy Select with U (or Tools > Selection Tools > Fuzzy Select).
- Click the background. GIMP selects the connected area of similar colour around the point you click.
- Adjust while you click. Keep the mouse button held and drag: right or down selects more, left or up selects less. The Threshold value in Tool Options sets the same thing numerically. Start around 15 to 30.
- Add the rest. Hold Shift and click any parts of the background that were missed, such as a shadowy corner.
- Press Delete. The background becomes transparent.
Three options matter. Antialiasing should be on, otherwise the edge becomes a staircase of hard pixels. Feather edges softens the boundary; a small radius of 1 or 2 pixels helps a photographed object sit naturally on a new background. Diagonal neighbors lets the selection spread through corners that only touch diagonally, which helps with thin gaps.
If the background colour also appears enclosed inside the subject, between an arm and a body or inside the letter O of a logo, use Select by Color (Shift+O) instead. It selects that colour everywhere in the layer, not just the connected patch.
Clean the edge before you export
A cutout that looks perfect over the checkerboard often shows a thin light or dark line once it sits on a new colour. That line is background colour mixed into the edge pixels. There are three fixes in GIMP, from quickest to most precise.
- Grow the background selection. Before deleting, with the background selected, choose Select > Grow and enter 1 or 2 pixels. The deletion then eats one pixel into the subject and takes the fringe with it.
- Shrink the subject selection. The same idea from the other side: with the subject selected, Select > Shrink by 1 to 3 pixels, then invert and delete. After a first cut, Layer > Transparency > Alpha to Selection turns what is left into a selection to shrink.
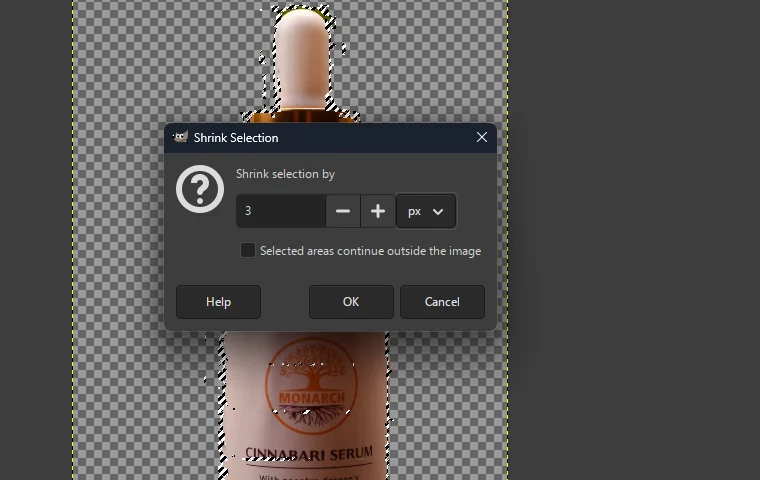
- Paint the mask. With a layer mask, paint black along the fringe with a soft brush at low opacity. Slow, but you decide every pixel.
For hair on a contrasting background, some fringe is almost unavoidable, because each strand really is a blend of hair and background. The white halo guide goes through why, and what each fix costs you.
Check the edge in thirty seconds
- Below your cutout layer, add a new layer with Layer > New Layer and set its fill to a strong colour, bright red or black.
- Zoom to 200 percent and look along the edge, especially hair and shoulders.
- Hide or delete the coloured layer before you export.
You should see: the subject sitting cleanly on the colour, with no pale outline and no background blotches left in the gaps.
If you do not: a thin light line means background is mixed into the edge: grow the background selection by a pixel and delete again, or paint the mask. Blotches mean the selection missed an enclosed area: use Select by Color on them.
Export a PNG that keeps the transparency
This is the second place the job fails. File > Save in GIMP writes an XCF file, GIMP’s own format, which almost no other program opens. To get a picture you can use elsewhere:
- Choose File > Export As (Shift+Ctrl+E).
- Type a name ending in
.png. GIMP picks the format from the extension, sophoto.pngis enough. - Click Export. A PNG options dialog opens.
- Leave the defaults, but make sure Save color values from transparent pixels is off. When it is on, the invisible pixels keep their old colours, which makes the file bigger and can bring the old background back in a program that ignores transparency.
- Click Export again.

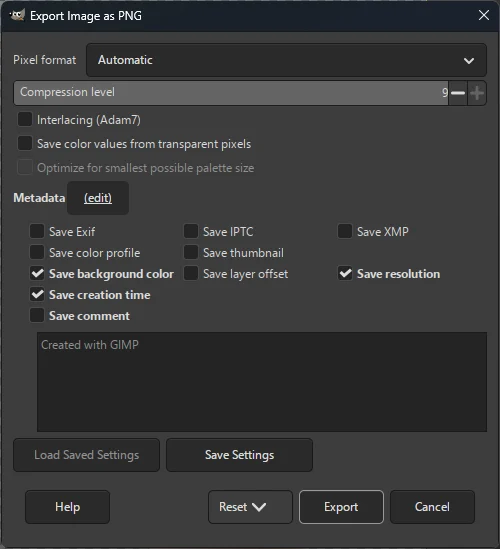
Do not export as JPG: the format has no transparency, and GIMP fills every empty pixel with a colour. If you need a JPG on white for a marketplace, add a white layer underneath and export that separately.
Keep the XCF as well, if you used a mask. It is the version you can still correct.
Then check the file, not the GIMP window. Drag the PNG into a browser tab: a transparent PNG shows the page colour behind the subject. If it shows white or black and you are sure the export was right, the problem is in the program you are viewing it with, which the guide to a PNG showing a black or white background covers.
When removing a background in GIMP does not work well
GIMP is capable, but some pictures cost far more time in it than they are worth.
Hair and fur against a busy background. Foreground Select can do a respectable job, but expect several rounds of marking unknown areas and previewing. If the hair and the background are similar in colour, no amount of marking will separate them cleanly.
Low contrast. A grey cat on a grey sofa has no colour boundary for Fuzzy Select to find and not much for Foreground Select either. Paths, drawn by hand, are the fallback.
Glass, smoke, veils. These are partly transparent in reality. A selection tool gives either the glass or the background, not the see-through mix of both. This is specialist retouching; the clipping path versus image masking guide explains what professionals charge for it and why.
Many photos. Every picture needs its own marking. For a product catalogue of fifty items, the manual approach costs hours.
Very large files on a small laptop. The Matting Levin engine uses a lot of memory on big images. Switch to Matting Global or scale down if GIMP stops responding.
The free way
Let the AI find the subject, then open it in GIMP
If Foreground Select is taking longer than the picture is worth, drop the photo on getPNG instead. The model finds the subject, the edge is refined against your full-size photo, and you download a transparent PNG at the original resolution, free and without an account. Open that PNG in GIMP for anything else: a new background, a shadow, text, or brushing out a stray patch, which getPNG has no brush for yet.
GIMP background removal troubleshooting
Deleted area turns white or another solid colour. No alpha channel. Undo, add one with Layer > Transparency > Add Alpha Channel, delete again.
The Delete key does nothing. Nothing is selected, or the selected layer is a different one from the picture. Check which layer is highlighted in the Layers dialog; the active layer is the only one that changes.
Foreground Select selects nothing, or everything. The foreground strokes were too few, or they crossed into the background. Undo the strokes, paint again well inside the subject, and preview before confirming.
The export dialog offers no PNG. Type the .png extension into the file name yourself. The Select File Type list at the bottom of the dialog is set to By Extension by default.
A checkerboard is visible in the exported file. GIMP only draws the checkerboard on screen; it cannot export it. If you see one baked into the picture, the original download was already a fake transparent PNG with the pattern painted in, and it has to be removed like any other background.
Jagged edge after deleting. Antialiasing was off, or the image is in Indexed mode. Switch to Image > Mode > RGB, turn Antialiasing on and select again.
Everything looks right, but Canva or Word shows white. Export as PNG, not JPG, and insert the file rather than pasting it from GIMP; pasting between programs can drop the alpha channel.
Related: other apps, same job
If you also use a browser editor, removing a background in Photopea follows almost the same logic with a Photoshop-style interface, and removing a background in Photoshop shows what the paid tools automate. The full comparison is in removing a background in any app, and how to make a transparent PNG covers the three routes side by side, GIMP’s Color to Alpha included.
If the thing you are cutting out is a logo or a drawing rather than a photograph, GIMP’s neighbour is the better tool for what comes next: Inkscape traces it into a vector, and getSVG’s Inkscape Trace Bitmap guide has the settings that work and the first-run trap where the result sits exactly on top of the original.
The steps, in short
- Add an alpha channel. Layer > Transparency > Add Alpha Channel. Without it, deleted pixels are filled with the background colour instead of becoming transparent.
- Pick the selection tool for the picture. Fuzzy Select for a plain, even background. Foreground Select for a person, pet or product on a busy background.
- Select the subject or the background. With Foreground Select, draw a rough outline, press Enter, paint over the subject and press Enter again to turn it into a selection.
- Invert and remove the background. Select > Invert so the background is selected, then press Delete, or add a layer mask from the selection to keep the edit reversible.
- Clean the edge. Grow or shrink the selection by a pixel or two before deleting if a coloured fringe is left, or paint on the layer mask with black and white.
- Export as PNG. File > Export As, give the file a .png name and export. File > Save only writes GIMP's own XCF format.
Questions
Why does GIMP fill the deleted area with white instead of transparency?
The layer has no alpha channel, so GIMP has nowhere to store transparency and paints the background colour instead. Undo, choose Layer > Transparency > Add Alpha Channel, and delete again. A layer without alpha shows its name in bold in the Layers dialog, which is the quickest way to check.
Does GIMP have a one-click background remover?
No. GIMP 3.2, the current release in September 2026, has no automatic subject detection. Foreground Select is the closest: you mark the subject roughly and GIMP works out the edge. For a one-click cutout, use a separate remover and open the PNG in GIMP afterwards.
How do I make a white background transparent in GIMP?
For a logo or drawing on white, Colors > Color to Alpha turns the white transparent and keeps soft edges soft. For a photo on a white wall, use Fuzzy Select on the wall and delete it, because Color to Alpha would also thin out every light colour inside the subject.
Why is my exported GIMP PNG not transparent?
Usually one of three things: the file was saved as JPG, a lower layer filled with colour is still visible, or the image was never given an alpha channel. Hide or delete any background layer, check the layer has alpha, and export again with a .png name. Then open the file in a browser tab to see what it really contains.
Which is better for hair in GIMP, Foreground Select or Fuzzy Select?
Foreground Select. Fuzzy Select only compares colours, so it either leaves a halo of background or cuts into the hair. Foreground Select estimates partial transparency along the edge. Mark the hairline itself as unknown rather than foreground and let the matting engine decide.
Is GIMP free and safe to use for private photos?
GIMP is free, open source software that runs on your own computer, so the photo is never uploaded anywhere while you edit it. Download it from gimp.org rather than a mirror site.