Short answer
To remove a background in Photoshop, select the photo layer and run the Remove Background quick action (in the Discover panel under Browse > Quick Actions). Photoshop finds the subject and hides the background with a layer mask. For hair, use Select Subject, then Select and Mask with Refine Hair, and output to a new layer with a mask. Export with File > Export > Quick Export as PNG. Select Subject can run on your device or in Adobe's cloud; you choose in Preferences.
To remove a background in Photoshop you have two good starting points, and both are automatic. The Remove Background quick action does everything in one click and hides the background with a layer mask. Select Subject gives you a selection instead, which you then refine, with hair and fur handled in Select and Mask. This guide covers both, the settings that decide whether a hair edge looks natural, how to export a PNG that is really transparent, and one preference that decides whether your photo is processed on your computer or on Adobe’s servers.
The steps were checked against Adobe’s Photoshop desktop help on 16 September 2026, when the current release was Photoshop 27.10 (August 2026). Adobe moves buttons between releases, and the Contextual Task Bar in particular shows different actions depending on what is selected, so if a button is not where this guide says, the menus given alongside it still work.
Which Photoshop method should you use?
| The picture | Start with | Then |
|---|---|---|
| Clear subject, you need it fast | Remove Background quick action | Touch up the mask with a brush |
| Person with loose hair, pet with fur | Select Subject | Select and Mask, Refine Hair |
| Several subjects, you want one of them | Object Selection tool | Layer mask |
| Hard-edged product for a catalogue | Pen tool path | Vector mask or selection from path |
| Plain, even background | Background Eraser or Magic Wand | Check the edge on a dark colour |
All of them end the same way: a layer whose background pixels are hidden or gone, exported as PNG.
Before you start: the layer has to be able to hold transparency
A photo opened in Photoshop usually arrives as a locked layer called Background. It cannot contain transparent pixels. Adobe’s help for the quick action says the layer must be active and unlocked. Click the padlock icon on the layer in the Layers panel to turn it into a normal layer (Photoshop names it Layer 0). If you skip this, Photoshop either converts it for you or the command is not available.
Duplicate the layer first (Ctrl+J, or Cmd+J on a Mac) if you want an untouched copy to hand.
Method 1: the Remove Background quick action
- Select the photo layer in the Layers panel. Only that layer.
- Open the Discover panel: click the search icon at the top right of the workspace, or choose Help > Photoshop Help.
- Choose Browse > Quick Actions, then Remove Background.
- Look at the result. Photoshop isolates the subject and adds a layer mask that hides everything else. The background now shows as a checkerboard.
The same command also appears in the Quick Actions section of the Properties panel when a pixel layer is selected. In Photoshop 2026 the quickest way in is the Remove background button on the Contextual Task Bar under the image, which appeared as soon as the photo was opened when we checked on 16 September 2026, and worked on a locked Background layer without unlocking it first. To run it on another layer, select that layer and click Refresh in the Discover panel. Revert undoes it.
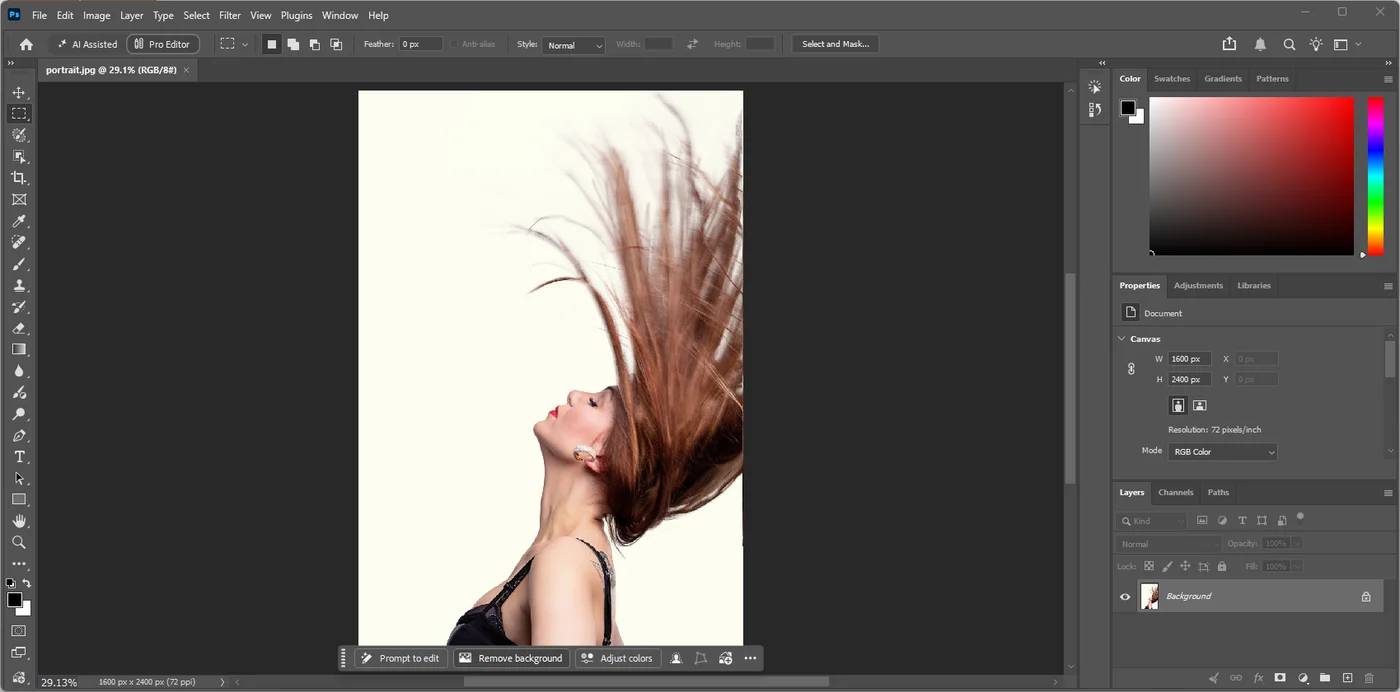
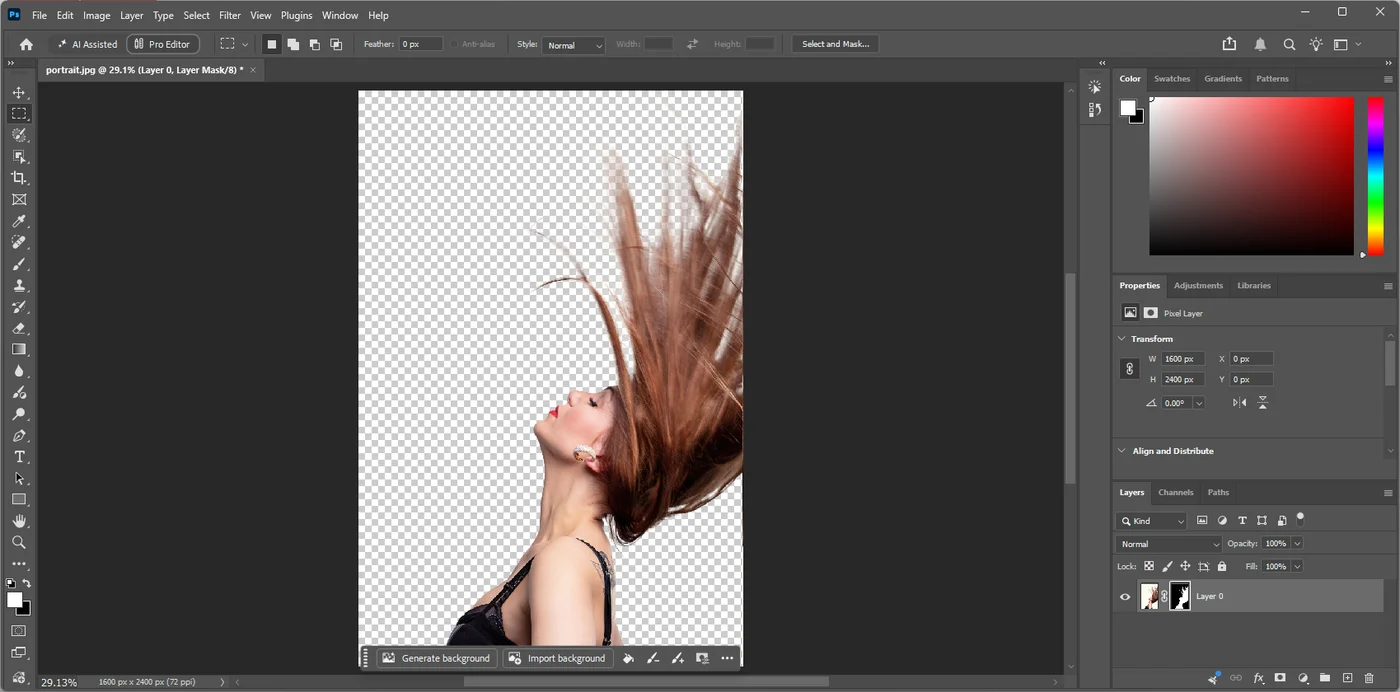
Why a mask and not a deletion: the mask is a black and white picture attached to the layer. White shows the pixels, black hides them, grey makes them partly transparent. Every background pixel is still there, so a mistake is a brush stroke away from being fixed, not a reason to start again.
Fix the mask by hand
Adobe’s own tip for this command is to refine the mask with the Brush tool. Click the mask thumbnail next to the layer (a white frame shows it is active), press B for the Brush, and press D to set the colours to black and white.
- Paint black over leftover background to hide it.
- Press X to swap to white and paint over parts of the subject that were cut off.
- Use a soft brush along edges and a hard brush for straight product edges.
- Lower the brush opacity for areas that should be partly see-through, like a veil or a motion blur.
Method 2: Select Subject and a layer mask
Select Subject gives you the same automatic detection as a selection you control.
- Choose Select > Subject, or pick the Object Selection tool and click Select Subject in the Options bar.
- Adjust the selection. Use Add to selection or Subtract from selection in the Options bar and drag over missed or extra areas. If the image has several subjects and you want one, use the Object Selection tool and hover over the one you want.
- Add the mask. Click the Add layer mask icon at the bottom of the Layers panel, or choose Layer > Layer Mask > Reveal Selection.
Before step 3, if the edge includes hair or fur, go to Select and Mask first.
Refining hair: Select and Mask
Hair is the hard part of any cutout, because the outer strands are thinner than a pixel and each edge pixel is a mixture of hair colour and background colour. Select and Mask is Photoshop’s workspace for exactly that.
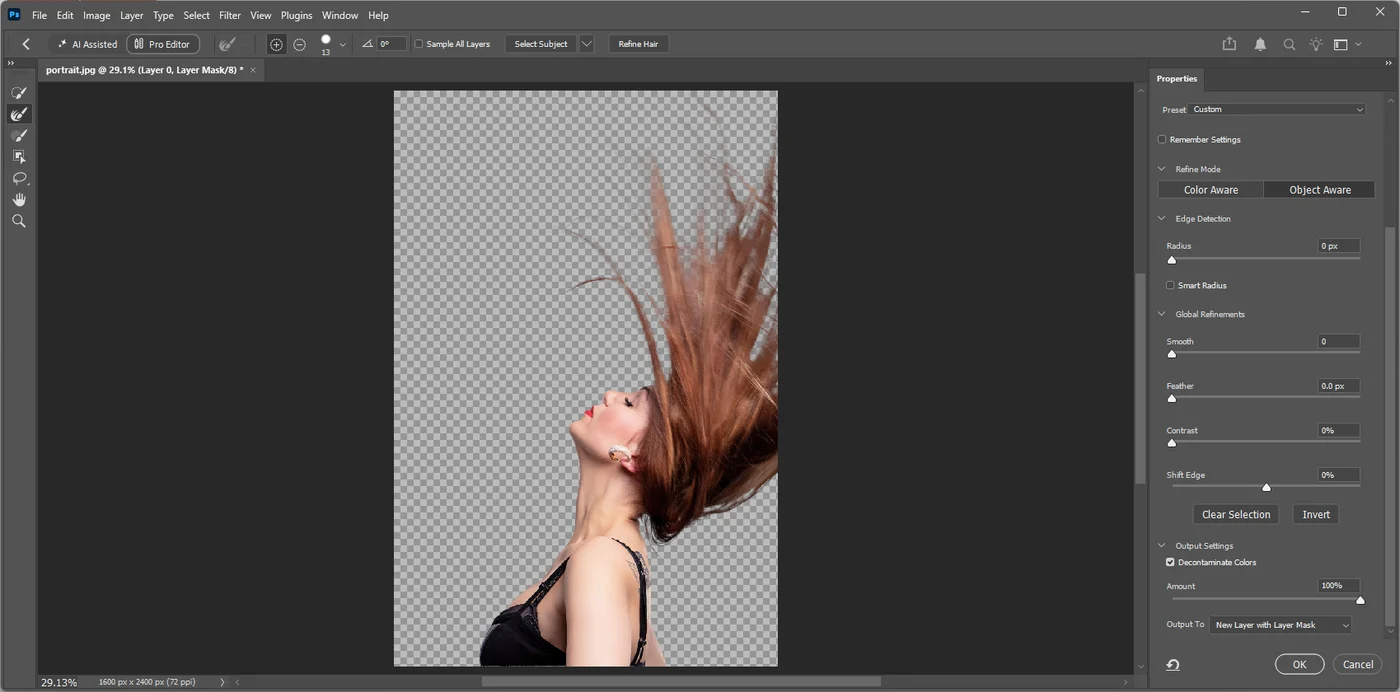
- With the subject selected, choose Select > Select and Mask (Alt+Ctrl+R, or Option+Cmd+R on a Mac).
- Pick a View Mode in the Properties panel that contrasts with the hair: On Black for blond hair, On White for dark hair, Overlay to see what is excluded in red. Press F to cycle through modes.
- Click Refine Hair. Photoshop recalculates the hairline.
- Set Refine Mode. Color Aware suits a simple, contrasting background; Object Aware suits hair or fur against a complex background.
- Brush the edge. Choose the Refine Edge Brush from the tools on the left and paint along the hairline, including a little background beyond the outer strands. Photoshop treats that band as uncertain and works out what is hair.
- Use Global Refinements sparingly. Smooth rounds jagged outlines, Feather blurs the edge, Contrast hardens it, Shift Edge moves it inwards or outwards. On hair, keep Feather and Contrast near zero; they undo the fine detail you just gained.
- Output. Under Output Settings, tick Decontaminate Colors, which replaces background colour in the edge pixels with nearby hair colour, and set Output To to New Layer with Layer Mask. Click OK.
Decontaminate Colors is what prevents the pale or green outline that shows once a portrait shot against a bright wall is put on a dark background. The cost is that it writes new colours into the edge pixels, so keep your original layer. The white halo guide explains the fringe and the other fixes.
Fringe left on a flattened cutout
If you have already applied or deleted, Photoshop’s older matting commands can still help. With the layer selected, Layer > Matting > Defringe replaces a band of edge pixels (you set the width); Remove White Matte and Remove Black Matte clear a light or dark halo from an anti-aliased edge.
Check the cutout on a hostile background
- Add a new layer below the cutout and fill it with a colour that contrasts with the hair: bright blue or pure black.
- Zoom to 100 percent and look at the hairline and the shoulders.
You should see: individual strands sitting on the new colour, with no light outline and no chunks of the old background between strands.
If you do not: a light line means background colour is still in the edge: go back to Select and Mask and tick Decontaminate Colors, or run Layer > Matting > Defringe on a copy. Chunks between strands need black paint on the mask, or another pass with the Refine Edge Brush.
Device or cloud: where Photoshop processes your photo
This is the privacy question most guides skip. Select Subject and Remove Background can run in two places, and there is a preference for it.
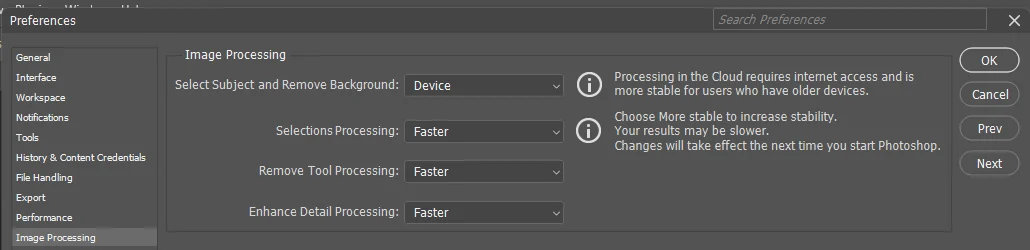
- Open Edit > Preferences > Image Processing on Windows, or Settings > Image Processing on macOS.
- Find the Select Subject and Remove Background dropdown.
- Choose Device or Cloud.
Device runs detection on your own computer, so the image does not leave it for this step. Cloud sends the image to Adobe’s servers for processing. Adobe’s earlier help for this option said cloud processing gives more detailed results and that it “does not save your data on our servers” (Adobe Photoshop help, 2022 release). Adobe’s current help page, updated February 2026, says Device is now the default and describes improved results with both. Defaults have changed between versions, so open the preference and check which one your copy is set to.
Adobe’s content analysis FAQ (updated June 2026) adds the other half. Adobe says it does not analyse content processed or stored only on your device. Content processed or stored on Adobe’s servers may be analysed for product improvement unless you switch that off at account.adobe.com/privacy under Content analysis for product improvement; business, team and school accounts are opted out automatically. The same FAQ says Adobe does not use your content to train generative AI models unless you submit it to Adobe Stock.
For a client’s unreleased product, an ID photo or anything under a confidentiality agreement, set the preference to Device before you click.
Export a PNG that keeps the transparency
- Hide everything below the cutout. Any visible layer with pixels underneath, a colour fill or the old Background, will be flattened into the export.
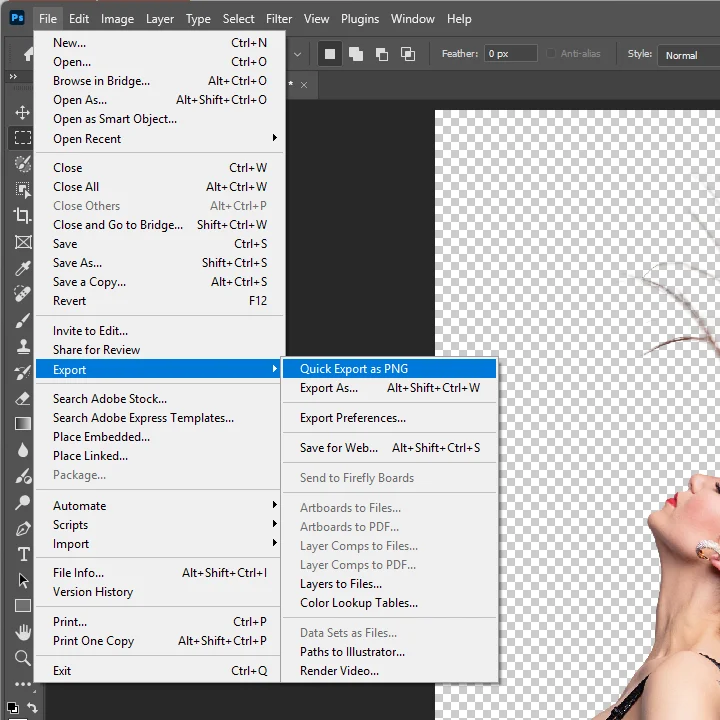
- Choose File > Export > Quick Export as PNG. Pick a location and a file name. Quick Export uses your saved export preferences.
- Check the preference once. Edit > Preferences > Export (Windows) or Photoshop > Preferences > Export (macOS): set Quick Export Format to PNG and the option to Transparency. Smaller File (8-bit) makes a palette PNG, which can turn soft hair edges hard.
- Or use File > Export > Export As for control over size, with PNG as the format and transparency switched on.
Save the PSD as well. The PNG is for use; the PSD keeps the mask you can still edit.
Never export a cutout as JPG: it has no transparency, and Photoshop fills the empty area with white. If a PNG looks white in another program but transparent in a browser tab, the other program is at fault, and the guide to a PNG with a black or white background lists which ones do that.
When removing a background in Photoshop does not work
The subject is not what Photoshop thinks it is. A person holding a product, a dog on a patterned rug: the detection picks the most prominent thing. Use the Object Selection tool to point at the one you mean.
Subject and background share colours. Grey hair against a grey sky will be guessed at. Paint the mask by hand.
Glass, smoke, fine veils. Automatic tools treat these as solid or as background. Real transparency here is manual masking work; clipping path versus image masking explains what retouchers do and charge.
Remove Background is greyed out. Select exactly one unlocked pixel layer. Text, shape and adjustment layers, or several layers selected at once, usually leave it unavailable.
Cloud processing is slow or fails. Switch the preference to Device, or check your connection.
Many product photos. Photoshop can record an action and batch it, but each result still wants checking.
The free way
No subscription, no upload
If you do not have Photoshop, or only need the cutout, drop the photo on getPNG. The model finds the subject, the edge is refined against the full-size photo so hair keeps its soft transition, and you download a transparent PNG at the original resolution. Edge shift and Feather adjust the outline without running the model again. There is no brush for painting a mask yet, so for hand corrections open the PNG in Photoshop, Photopea or GIMP.
Related guides
Removing a background in Photopea uses nearly the same menus in a free browser editor, and removing a background in GIMP is the free desktop route. For how every other app handles this, see removing a background in any app.
Cutting a subject out is not the same job as turning one into vector shapes, and Photoshop does not do the second one: it has no Image Trace, and the work path it can make from a selection is a poorer thing. getSVG’s vectorizing in Photoshop shows the difference at a zoom level where it is visible, and what to use instead when a logo has to go on signage or a shirt.
The steps, in short
- Unlock and select the photo layer. Click the photo layer in the Layers panel. A locked Background layer needs unlocking so it can hold a mask.
- Run Remove Background. Open the Discover panel with the search icon, choose Browse > Quick Actions > Remove Background. Photoshop adds a layer mask that hides the background.
- Or select the subject yourself. Select > Subject, or the Select Subject button with the Object Selection tool, then add a layer mask from the selection.
- Refine hair in Select and Mask. Select > Select and Mask, click Refine Hair, brush the hairline with the Refine Edge Brush, and output to New Layer with Layer Mask.
- Fix the mask by hand. Paint on the layer mask with black to hide and white to reveal, using a soft brush at the edges.
- Export a transparent PNG. File > Export > Quick Export as PNG, or Export As with PNG and Transparency on. Keep the PSD for later changes.
Questions
What is the fastest way to remove a background in Photoshop?
The Remove Background quick action. Select the unlocked photo layer, open the Discover panel, choose Browse > Quick Actions > Remove Background. It takes one click and leaves a layer mask, so nothing is deleted and you can repair the result with a brush.
Does Photoshop upload my photo to remove the background?
It depends on one setting. Under Edit > Preferences > Image Processing (Windows) or Settings > Image Processing (macOS), Select Subject and Remove Background can be set to Device or Cloud. On Device, the processing stays on your computer. On Cloud, the image is processed on Adobe's servers, which Adobe says gives more detailed results and does not save your data.
Why is Remove Background greyed out in Photoshop?
The active layer is usually not a single, unlocked pixel layer: several layers selected, a text or shape layer, a locked layer, or an adjustment layer. Select only the photo layer and make sure it is unlocked, then try again.
How do I remove the background around hair in Photoshop?
Use Select Subject, then Select > Select and Mask. Click Refine Hair, set Refine Mode to Object Aware for a busy background, brush along the hairline with the Refine Edge Brush, tick Decontaminate Colors, and output to New Layer with Layer Mask.
Why does my Photoshop PNG still have a white background?
A visible Background layer or fill layer below the cutout, a JPG export, or Transparency switched off in Export As. Hide every layer except the cutout, export as PNG, and check the PNG option in Preferences > Export is Transparency, not Smaller File (8-bit).
Can I remove a background in Photoshop without a subscription?
Photoshop on desktop is sold as a subscription, with a free trial from Adobe. Free alternatives with a similar interface are Photopea in a browser and GIMP on your computer, or a one-click remover for a quick cutout.