Short answer
To remove a background in Photopea, open the photo and choose Select > Remove BG. Photopea adds a raster mask that hides the background. For more control, use Select > Magic Cut: paint green over the subject and red over the background, then click OK. Export with File > Export As > PNG. Photopea's editor runs in your browser, but its developer says Remove BG and Subject are done by an outside company's service; Magic Cut and the manual tools are not.
To remove a background in Photopea, the free Photoshop lookalike that runs in a browser tab, you have one automatic command and several guided ones. Remove BG does it in a click. Magic Cut lets you mark what to keep and what to remove. Refine Edge handles hair. Then an export to PNG keeps the transparency. This guide goes through each, when to use which, and something Photopea’s front page does not tell you: the one-click commands are not processed in your browser like the rest of the editor.
The steps and menu names were checked in Photopea at photopea.com on 16 September 2026. Photopea is updated often and without version numbers, so if a label has moved, the Select menu is still the place to look.
Where the background tools are in Photopea
Everything for this job sits in the Select menu. On 16 September 2026 it listed, among others:
- Remove BG: one-click automatic background removal
- Color Range…: selects every pixel of a chosen colour
- Magic Cut…: guided cutout from green and red brush marks
- Subject: one-click automatic selection of the main subject
- Refine Edge…: a workspace for hair, fur and soft edges
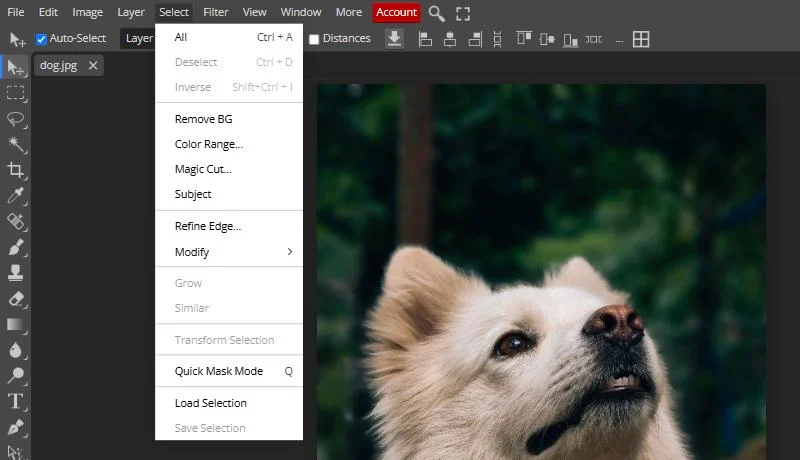
The toolbar on the left adds the Magic Wand and Quick Selection tools, and the Pen tool for hand-drawn paths.
| The picture | Use | Uses the outside service |
|---|---|---|
| Clear subject, you want it fast | Select > Remove BG | Yes, according to the developer |
| Subject with a fuzzy or complex edge | Select > Magic Cut | No |
| Loose hair or fur | Select > Refine Edge | No |
| Plain, even background | Magic Wand or Color Range | No |
| Hard-edged product | Pen tool path | No |
Method 1: Remove BG, the one-click way
- Open the photo. Go to photopea.com, then File > Open, or drag the file onto the page. Photopea opens JPG, PNG, WebP, PSD and many others.
- Select the photo layer in the Layers panel on the right.
- Choose Select > Remove BG.
- Look at the result. Photopea adds a raster mask to the layer, which hides the background. The hidden area shows as a checkerboard.
When we tried it on 16 September 2026, the first click also showed the tip “For a better result, press the button again.” Free users can be asked to watch a short video ad to use the feature: the developer explained on Photopea’s GitHub issue tracker in March 2026 that the feature is offered to free users in exchange for a video ad, and to Premium subscribers without one.
Because the result is a mask, the background pixels are hidden, not deleted. To fix a mistake, click the mask thumbnail next to the layer, pick the Brush, and paint black to hide more or white to bring back part of the subject.
Why Remove BG needs an ad, and what it means for privacy
Photopea’s own Learn page says the editor runs completely on your device and does not upload your files, and for nearly everything in Photopea that is true: the editing happens in your browser tab. Remove BG and Select > Subject are the exceptions. On Photopea’s GitHub issue tracker, the developer explained in June 2025 that Photopea pays another company each time someone uses those two commands, and that a watched video ad covers that cost. Processing by another company means the picture, or the part being processed, is sent to that company.
That is a reasonable way to fund a free tool, and for a picture of a product or a meme it hardly matters. For a photo of your family, a customer’s item or a document, use Magic Cut or Refine Edge instead, which are not among the commands the developer says use the service. You can check the difference yourself with the network tab: the guide on checking that a website is not uploading your photos shows how.
Method 2: Magic Cut, when you want control
Magic Cut is older and less famous than Remove BG, and often better on awkward pictures, because you tell it what the subject is.
- Choose Select > Magic Cut. A workspace opens with two sides: you paint on the left and see the result on the right.
- Paint green over the subject. Rough strokes through the middle are enough; you do not need to trace the edge. Photopea may already show an initial guess, which you only need to correct.
- Paint red over the background. A few strokes across each distinct area of background: sky, wall, floor.
- Use grey as an eraser if a stroke went where it should not.
- Adjust Border. It starts at 0, and it matters more than any brush mark. Keep it low for a hard-edged object; for hair or fur raise it, so the edge becomes a soft transition rather than a sharp line. On the dog in the screenshots below, 25 turned a jagged outline into soft fur.
- Click OK. The output list next to OK decides where the cutout goes; on 16 September 2026 it was set to New Layer, which puts the cutout on a new layer and hides the original below it.
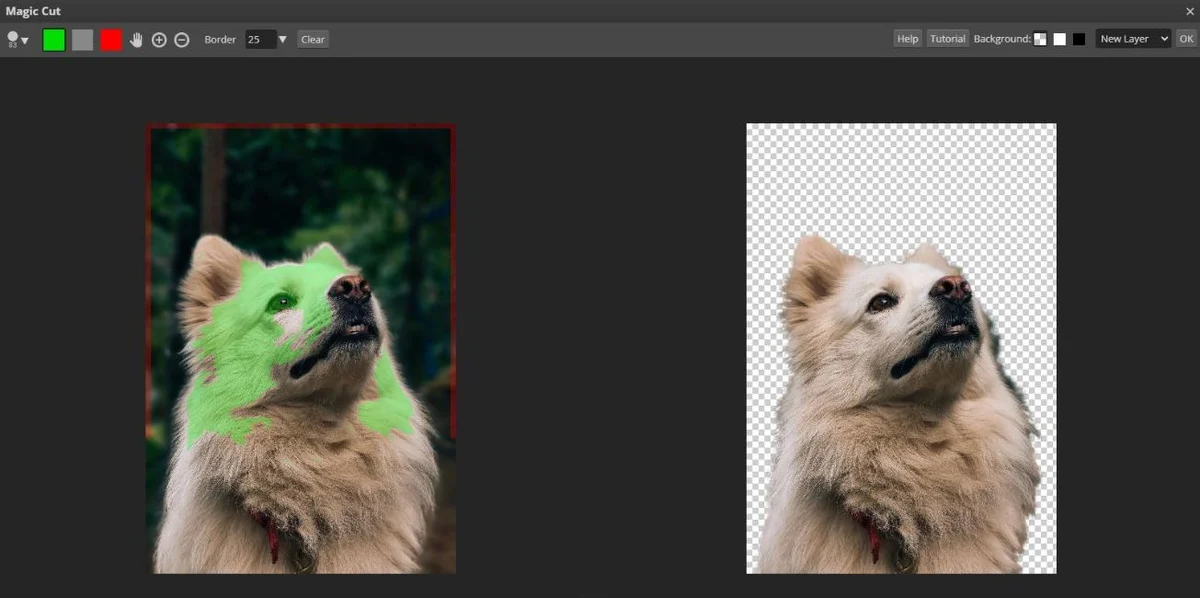
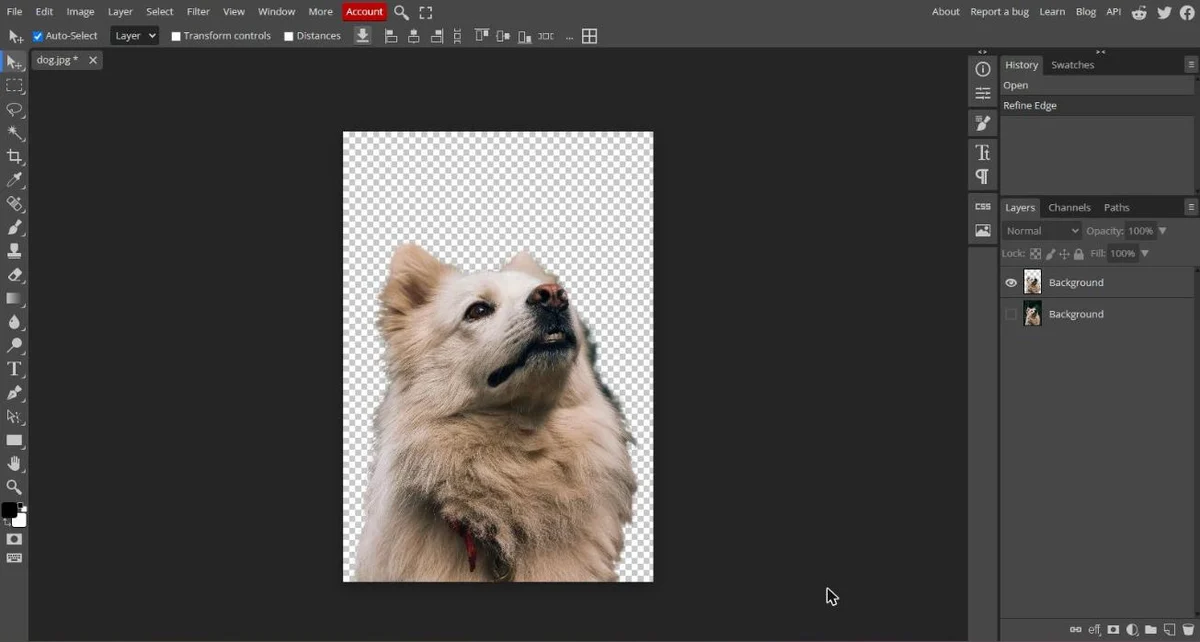
If the result bleeds into the background somewhere, add a red stroke right next to the leak rather than painting along the whole edge. The tool recalculates from every mark, so small corrections near the problem do the most.
Method 3: Refine Edge, for hair and fur
Refine Edge is Photopea’s workspace for edges that are neither fully subject nor fully background. It works from what the Photopea documentation calls a trimap: three colours painted over the picture.
- Start with a rough selection of the subject, from Magic Cut or the Quick Selection tool. This is optional, but it saves time: Photopea turns the selection into white (subject) and black (background) for you.
- Choose Select > Refine Edge, or click the Refine Edge button in the top bar of any selection tool.
- Paint grey over the uncertain zone: the hairline, the outer strands, the fur. Photopea works out how transparent each pixel in the grey area should be.
- Or use Border in the top menu to generate the grey band automatically along the edge of your selection.
- Paint white over any subject that is marked black, and black over background marked white.
- Choose the mode. New Layer puts the cutout on a new layer, Raster Mask adds a mask to the current layer, Selection gives you a selection. Raster Mask is the most flexible.
- Click OK in the top right corner.
A wide grey band on soft hair gives more natural strands; a wide band on a hard edge makes it mushy. Keep the grey where the edge is actually uncertain.
Method 4: Magic Wand or Color Range, for plain backgrounds
For a subject on a plain sheet, wall or studio backdrop, the old tools are the fastest. With the Magic Wand, set Tolerance in the top bar (start around 20 to 30), keep Contiguous ticked, click the background and Shift-click any parts that were missed. Select > Color Range selects a colour everywhere in the image, including gaps enclosed by the subject. Then press Delete, or better, invert the selection and add a mask.
Check the edge before you export
- Add a new layer below the cutout (the new layer icon at the bottom of the Layers panel) and fill it with a strong colour: black, or bright blue.
- Zoom to 100 percent and scan the edge, especially hair, fingers and gaps between arms and body.
- Delete or hide that layer when you are done.
You should see: the subject sitting cleanly on the colour, with no pale line along the edge and no leftover patches of background.
If you do not: a pale line means old background colour is mixed into the edge pixels: paint the mask a little darker along it, or see the white halo guide. Leftover patches need red marks in Magic Cut or black paint on the mask.
Export a transparent PNG from Photopea
- Hide or delete everything below the cutout in the Layers panel. A visible layer underneath gets flattened into the file.
- Choose File > Export As > PNG. The Save for Web window opens, where you can also set the output size.
- Click Save. The PNG downloads to your device.
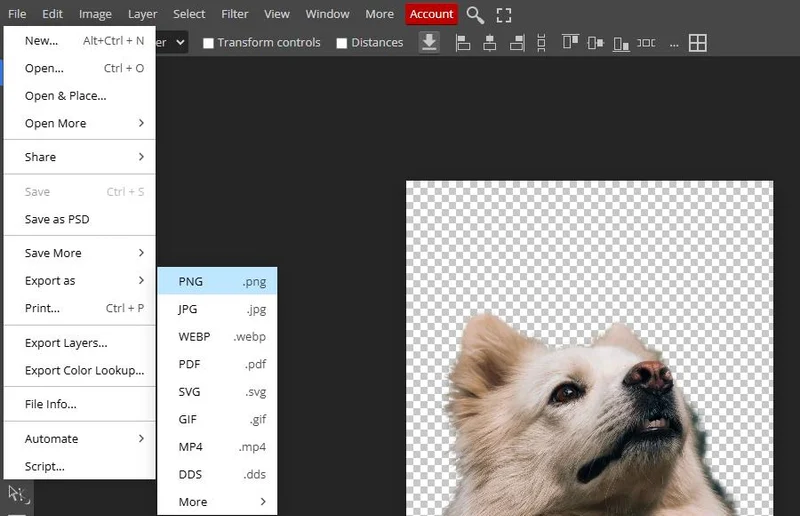
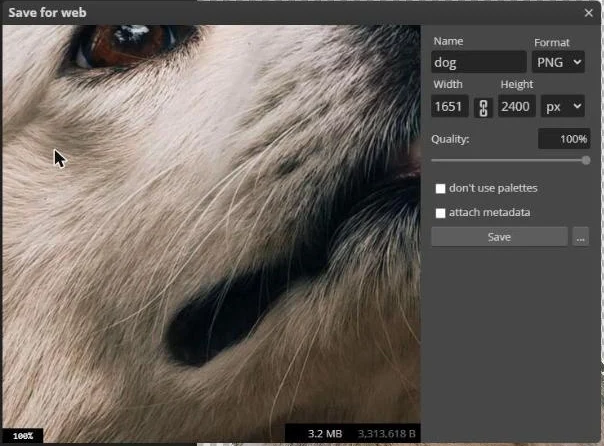
Photopea’s help notes that PNG supports transparent areas and JPG does not, so a JPG export fills the empty area with a colour. To keep working later, File > Save as PSD stores the layers and the mask; the PNG does not.
Then open the downloaded PNG in a browser tab to check. If it shows the page colour around the subject, it is transparent. If it looks fine there but white in another app, that app is flattening it, not Photopea.
When removing a background in Photopea does not work
Remove BG does nothing, keeps loading, or shows an error. Photopea’s developer has pointed users with this problem at ad blockers, including privacy extensions they did not think of as ad blockers, because the free route depends on a video ad. Outages of the outside service have also happened and were fixed within hours. Try a private window with extensions off, or use Magic Cut.
Remove BG and Subject are not available in your country. Users in Russia reported in March 2026 that video ads, and so the free route to these features, did not load there. Magic Cut and the manual tools still work.
The cutout includes part of the background with the same colour as the subject. Automatic detection guesses; Magic Cut with red marks right on the confusing area gives Photopea the answer.
The editor is slow with a very large photo. Everything except Remove BG and Subject runs on your own device, so a phone or older laptop struggles with a 40-megapixel image. Scale it down with Image > Image Size if you do not need the full size.
Ads cover part of the screen. Photopea is funded by ads on the free plan; Premium removes them.
The free way
One click, and nothing sent anywhere
If you want the one-click result without the ad and without the picture going to another company, drop the photo on getPNG. The model runs in your browser, the edge is refined against the full-size photo, and you download a transparent PNG at the original resolution. Then open that PNG in Photopea if you want to add a background, text or a shadow, or to paint a correction, since getPNG has no brush yet.
Photopea compared with Photoshop and GIMP
Photopea copies Photoshop’s menus closely, so removing a background in Photoshop reads almost the same, with Select Subject and Select and Mask in place of Subject and Refine Edge. GIMP is the free desktop alternative that never needs a connection. For the privacy side of online editors in general, is it safe to upload photos online compares what popular services say they do, and the white halo guide covers the pale edge problem in every app. The full table is in removing a background in any app.
The steps, in short
- Open the photo. Go to photopea.com, then File > Open, or drag the photo onto the page.
- Run Remove BG. Select > Remove BG. Photopea adds a raster mask to the layer that hides the background. Free users may be asked to watch a short video ad first.
- Or use Magic Cut. Select > Magic Cut. Paint green on the subject, red on the background, adjust Border for soft edges, and click OK.
- Refine hair with Refine Edge. Select > Refine Edge. Paint white for subject, black for background, grey over the hairline, choose Raster Mask as the mode, and click OK.
- Hide any background layer. In the Layers panel, hide or delete anything below the cutout, or it will be flattened into the export.
- Export as PNG. File > Export As > PNG, then Save. Use File > Save as PSD to keep the mask for later.
Questions
Is Photopea's Remove BG free?
Yes, with a condition. Photopea's developer has explained that each use of Remove BG and Select > Subject costs Photopea money, paid to another company, so free users are asked to watch a short video ad to use it. Photopea Premium users skip the ad. An ad blocker can stop the feature from working.
Does Photopea upload my photos?
The editor itself runs in your browser, and Photopea's Learn pages say it does not upload your files. The exceptions are Remove BG and Select > Subject: the developer says these are processed by a paid outside service, so the picture has to be sent to it. The developer names only those two; Magic Cut, Refine Edge, the Magic Wand and the export are ordinary editor tools that run in the page.
Why does Remove BG not work in Photopea?
The three usual causes: an ad blocker or privacy extension stopping the video ad the feature relies on for free users, a temporary outage of the outside service (the developer has fixed several within hours), or a connection problem. Try a private window with extensions off, or use Magic Cut instead.
What is the difference between Magic Cut and Remove BG in Photopea?
Remove BG is automatic: one click, an AI guess, a mask. Magic Cut is guided: you paint green on what to keep and red on what to remove, and Photopea works out the edge from your marks. Magic Cut takes a minute longer but gives you control, and it is not one of the two commands the developer says use the outside service.
How do I save a transparent PNG from Photopea?
Hide or delete every layer below the cutout, then File > Export As > PNG and Save. Do not choose JPG, which has no transparency. File > Save as PSD keeps the layers and mask for later edits.