Short answer
A PNG for a shirt needs four things: enough pixels for the print size at 300 dpi (a 12 by 16 inch print is 3,600 by 4,800 pixels), a real alpha channel so nothing prints as a box, no old background colour left in the edge pixels, and a file that has not been shrunk or recompressed on the way. Check the last two on a dark colour, because that is where a halo shows. Your shop's upload page sets the exact size and file limit.
A print-on-demand shop asks for a PNG for the same reason everybody does: it is the common format that can hold a picture with nothing behind it. What the shop does with your file is then very literal. It prints what the pixels say, at the size you chose, on a garment that is not white. Four things go wrong again and again, and none of them is the fault of the printer: a file with too few pixels for the print, a “transparent” picture that is not, a rim of old background colour round the edge, and a file that was squeezed on the way to the shop.
This page covers what to check in each, in the order that costs least to fix. getPNG makes the cutout and keeps it at the full resolution of the photo, and it does not make the shirt design, add text or place the print on a garment. For that you need the shop’s own designer, or an editor, and the rules below hold for whichever one you use. The numbers in the shop’s template always outrank the general ones here.
What a shirt print needs
| What | Why it matters | How to check it |
|---|---|---|
| Pixels for the print size at 300 dpi | Fewer pixels are enlarged, and enlargement is soft | Print width in inches times 300 |
| A real alpha channel | Otherwise a box prints round the subject | View the file on a dark colour |
| No old background colour in the edge | It shows as a pale rim on a dark shirt | Zoom to 300 per cent on black |
| An unshrunk, unrecompressed file | Each lossy step costs detail the print can show | Compare with the original at full size |
Each row is a separate decision, so they are worth taking one at a time.
Pixels: work out the print, not the file
The only number that matters is how many pixels run across the printed width. Dots per inch is that number divided by inches, which is why DPI explained calls the figure stored inside a file a note rather than a measurement. A shop that says “300 dpi” wants roughly 300 pixels for every inch the design will be printed.
So start from the print area in the shop’s template and multiply:
- A 10 by 12 inch print at 300 dpi is 3,000 by 3,600 pixels.
- A 12 by 16 inch print is 3,600 by 4,800 pixels, which is 17.3 megapixels.
- A 4 by 4 inch chest logo is 1,200 by 1,200 pixels.
Then compare with what you have. A phone photo of 4,000 by 3,000 pixels is 13.3 by 10 inches at 300 dpi, so on its own it is plenty for a chest print and enough for a full front if the subject fills the frame.
That last clause is the catch with a cutout. If the person or object takes up a third of the width of the photo, the cutout has a third of the pixels, and a design cropped tight round it may be 1,300 pixels across, not 4,000. The pixel count to check is that of the subject, after the crop. The DPI guide makes the same point about cropping: work out the resolution of the part you keep.
getPNG helps here in one specific way. It gives the cutout back at the full size of the photo you dropped, with no cap and no watermark, so you start with every pixel the camera recorded. It also has a tight crop around the subject, and it never enlarges a picture past its own pixels, so what you see in the size panel is what you actually have.
If the subject is short of the pixels you need, there are two honest options. Print smaller, which is free and always works. Or enlarge, which makes new pixels rather than finding lost ones: what AI upscaling can and cannot do and upscaling an image for print explain when that is a good trade. Flat artwork and lettering enlarge far better than a photograph.
Transparency: a real alpha channel, and no white box
A PNG can hold an alpha channel, a fourth number for every pixel that says how solid it is. Where alpha is zero, nothing prints and the shirt shows through. That is the whole reason to send a PNG, and it only works if the file has one. The alpha channel, in plain words covers what is stored.
Three common ways the box appears anyway:
The picture is a JPG renamed. JPG cannot hold transparency, so a JPG with a .png name has a solid background, usually white. Remove the background first, and save as PNG.
The checkerboard is painted in. Some images downloaded from the web show a grey and white chequer that is part of the pixels, not a display convention. It prints. A fake transparent PNG shows how to tell, and the cure is to cut the subject out of it again.
A viewer flattened it. Some apps and chat tools replace transparency with black or white when they re-save a picture. Send the file as a file, not as a photo in a message. PNG with a black or white background lists where this happens.
Before uploading, look at the file on a dark colour and then on a light one. A real alpha channel looks right on both. A white box is obvious on the dark one.
Edges: why a dark shirt finds your halo
This is the one that surprises people, because the file looked fine on the screen.
An edge pixel on a photograph is part subject and part old background, and a good cutout makes it part see-through. Its colour still includes some of the old background, though. If the photo was taken against a light wall, that colour is light, and it is invisible on a white page. Put the same cutout on a black shirt and every edge pixel shows its leftover pale colour as a thin glowing outline. That is the white halo, and it is the reason a design that looked clean in the editor can look cheap on a navy hoodie.
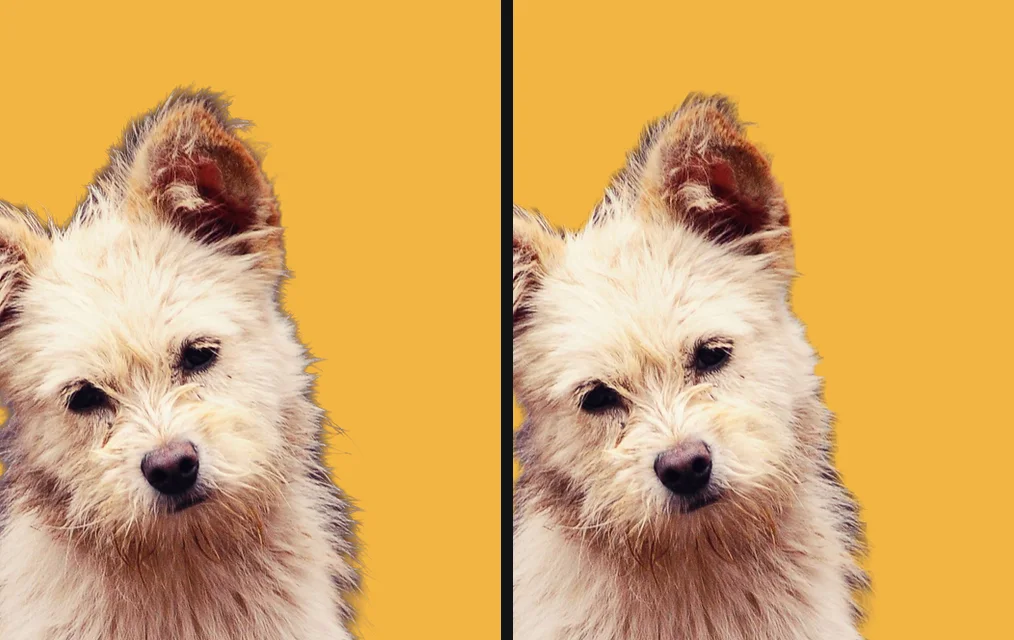
White halo or jagged edges around a cutout explains the cause in full. For a shirt the practical order is:
- Preview on the colour of the garment, or on black if the shop sells dark colours. Zoom to 300 per cent on the edge.
- Shrink the edge by a pixel or two. Edge shift in getPNG moves the outline in by up to five pixels and removes the band that still carries the old colour.
- Take the old colour out of the soft pixels with Clean edge colour, which recolours the edge pixels instead of deleting them. It is the better fix for hair and fur, where shrinking would eat the detail you want.
- Feather only if the edge now looks cut with scissors. A little softness blends a hard edge into fabric.
All three controls apply at full resolution in a fraction of a second, because the model does not run again, so trying them costs nothing.
Test your cutout on the colour of the shirt
- Remove the background from your photo in getPNG and set the preview background to black, or to the shirt colour you are printing on.
- Zoom in on the outline at 300 per cent, on the part of the edge that was against the brightest background.
- Step Edge shift from 0 to minus 1, then minus 2, and switch Clean edge colour on and off, watching the rim.
You should see: a pale or coloured rim thinning at minus 1 or minus 2, or disappearing with Clean edge colour on, while the outline stays where the subject really ends.
If you do not: if the rim is still there at minus 3 and fine details are starting to disappear, the photo was shot against a background too close to the subject’s own colours. Reshooting against a plainer wall will beat any slider, as the halo guide explains.
One more point about the edge itself. The soft, partly transparent pixels along it are what make hair look like hair, and getPNG keeps them rather than snapping them to on or off. How a given print method treats a half-transparent pixel is up to the shop and the method: some print them faithfully, and some turn them into a hard edge or a speckle. If a shop publishes a rule about it, follow it, and if it does not, a test print on one shirt is cheaper than a batch.
Keep the file as it came out
Two last things between your file and the shop.
Do not shrink the master. Resizing down to fit a form removes the pixels the print needed. If the upload has a file size limit, make a copy that fits and keep the full-size one. The shop’s own page says what its limit is, and the limit is the one number in this article that changes by shop.
Be careful with colour reduction. A PNG gets small by storing a colour table rather than a colour for every pixel, which is what the compressor on getPNG does, and it changes pixels slightly. For a screen that is invisible. For a large print of a photograph it can show as banding in a smooth gradient. Why a PNG is so large goes through the options, and the safe order for a print master is: keep it as it is, and compress only a copy for sharing.
If you are pressing a transfer at home rather than ordering a print, the cutout is the same but the paper adds its own steps, mirroring and a close trim among them, which an iron-on transfer from a photo covers. For a printed film that slides onto a mug or a tile instead of pressing onto fabric, waterslide decals from a photo covers clear and white paper and why the cutout matters most there. For a dye that sets into polyester rather than a film that sits on the cloth, a sublimation PNG covers why a fake white background prints and what white does on a blank.
The same goes for sending: a shop upload, an email attachment or a cloud link delivers the file as it is, and a chat app may not.
A checklist before you upload
- The print area in inches, from the shop’s template, times 300, gives the pixel size you need.
- The subject, after cropping, has at least that many pixels across.
- The file is a PNG with a real alpha channel: dark and light previews both look right.
- No pale rim on the edge when viewed on black at 300 per cent.
- The master is untouched, and any compressed copy is only for sharing.
- You have read the shop’s own rules for file size, colour profile and how it treats partial transparency, which differ and are not stated here.
The free way
Cut out the subject at the full size of the photo
Drop the photo on getPNG, preview it on black, pull the edge in a pixel or two and switch on Clean edge colour if there is a rim. You get a transparent PNG at the resolution of the original, with no watermark and nothing uploaded.
The short version
A shirt print is a literal reading of your pixels. Work out the print size in inches and multiply by 300, count the pixels in the subject after cropping, make sure the PNG has a real alpha channel, and check the edge on a dark colour before it goes anywhere near a shop. Keep the full-size file as the master, and treat every number about the shop’s own limits as theirs to give.
Questions
What size should a PNG for a shirt be?
Whatever your shop's print area is, in inches, multiplied by 300. A 12 by 16 inch print needs 3,600 by 4,800 pixels, a 10 by 12 inch one needs 3,000 by 3,600. The shop's upload page or template gives the print area, and it is the number to trust over any general rule, because it differs between shops and between garments.
Does a shirt PNG have to be transparent?
For a design with an edge, yes. A PNG with a white or coloured background prints that background as a rectangle unless the shop removes it for you, and not every shop does. A transparent PNG prints only the subject, and the shirt shows through everywhere else.
Why does my design have a white outline on a dark shirt?
The edge pixels still carry some colour from the old background, usually light. On a white screen nobody sees it, and on a dark shirt it reads as a pale rim. Shrinking the edge by a pixel or two, or taking the old colour out of the soft edge pixels, removes it. Check on a dark colour before you upload.
Is 72 dpi enough for a shirt print?
The number stored in the file does not matter: the pixel count does. A 72 dpi label on a file with 3,600 by 4,800 pixels is fine for a 12 by 16 inch print, and a 300 dpi label on a file of 600 by 800 pixels is not. Work out the pixels from the print size, then look at what you have.
Can I turn a small image into a big shirt print?
You can enlarge it, and it will be softer than a file made at full size. Enlargement makes new pixels rather than recovering detail that was never captured. Smooth artwork and logos enlarge well, and a photograph does less well. If the picture is too small for the print size, a smaller print is the honest fix.
Should I compress a PNG before uploading it for a shirt?
Not as a master. Reducing a PNG's colours is what makes it small, and it changes pixels slightly, which a large print can show. Upload the full file, and keep the compressed copy for sharing or for a mock-up. If the shop sets a file size limit, resize or compress a copy until it fits, and keep the original.