Short answer
To take product photos at home: put the product near a large window in soft, indirect light and turn off any other light that would mix a different colour into the shot; stand or lean a large sheet of white card behind and under it, curved rather than creased, so there is no hard line where it meets the surface; shoot on a phone with the flash off, the grid on and the lens at its normal focal length, moving closer instead of zooming; then cut the product out and put it on the exact background each marketplace wants. The card only needs to look roughly right in the photo; the cutout step is what makes it exactly right.
Most advice about product photography assumes a studio: strobes, a proper backdrop stand, a camera with a hot shoe. Selling one thing, or twenty things, on Etsy, eBay or a small Shopify store does not need any of that. It needs a window, a sheet of card, a phone, and a cutout done properly afterwards. This guide covers the setup that gets most products to a usable photo, then the specific marketplace pages this site already has for the exact background and size each one wants.
Light: the one thing that decides the rest
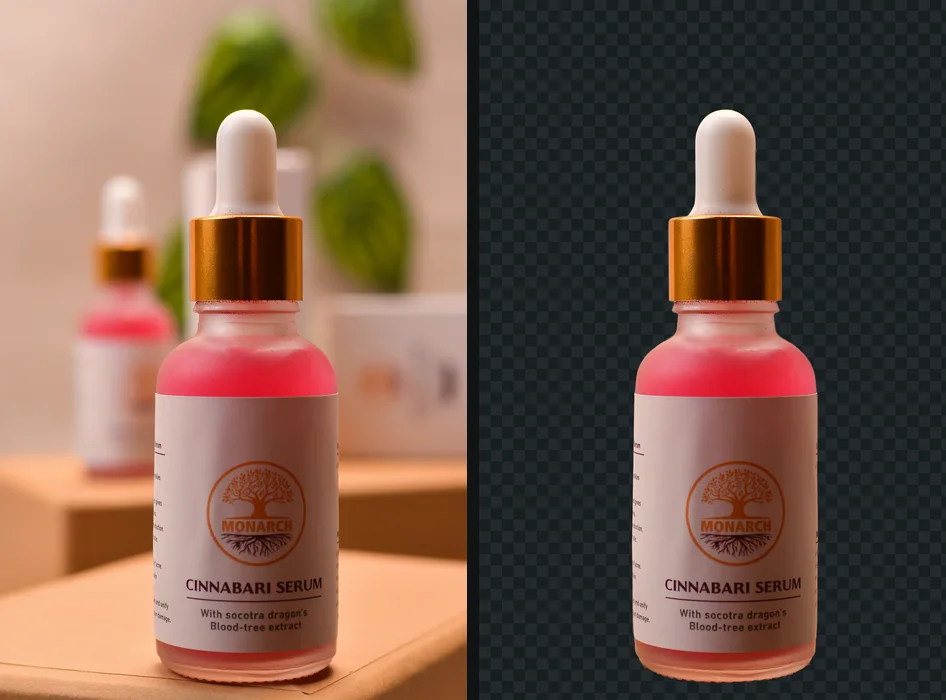
A single, large, soft light source beats a room full of small ones. A window does that job better than most lamps, because it is bigger than any bulb and daylight is close to neutral in colour.
- Position the product near the window, not right against the glass, where direct sun can cast a hard shadow and blow out one side. A few steps back from the glass, in the light but out of direct sun, is usually softer.
- Diffuse strong sun with a sheer curtain, or shoot on an overcast day. Cloud cover is, in effect, a giant diffuser already doing the work for you.
- Turn off other lights in the room. This matters more than it sounds like it should. Daylight and an indoor bulb are different colours of white, and where the two overlap on the product or the background, the camera cannot correct for both at once. One light source, even a dim one, photographs more evenly than two mismatched ones.
- Add a fill card if there is a dark side. A second sheet of white card or paper propped opposite the window bounces a little light back into any shadow, without adding a second light source with its own colour.
The background: a card, curved, not creased
The classic advice is a sheet of white card or poster board, and it still works, with two adjustments worth making.
Curve it, do not crease it. Tape or clamp the card so it runs from vertical behind the product to horizontal underneath it in one smooth curve, rather than folding it into a corner. This is what studio photographers call a sweep, and its whole purpose is to remove the line where a wall meets a tabletop, which is the part of a plain background photo that most often gives it away as a plain background photo.
Contrast matters more than colour. Product photos on a white background covers this from the marketplace side, but it applies here too: a background that contrasts with the product cuts out more cleanly than one that matches it. A pale or white product against white card has almost no visible edge for a background remover, or a person, to find. If the product is light in colour, a light grey or soft pastel card gives the edge something to hold onto; a genuinely white or very light product is one of the few cases where a mid-tone background actually helps more than a white one, even though the final photo will end up on white regardless.
That last point is the reason this guide does not spend much time getting the card to read as pure white in-camera. Overexposing until a background clips to 255, 255, 255 also washes out anything pale in front of it. It is easier to shoot a background that merely reads clearly against the product, and let the cutout step put it on exact white afterwards, discussed below.
The phone: settings that matter more than the model
Almost any phone from the last several years takes a perfectly usable product photo. What trips people up is rarely the hardware.
- Flash off. A phone’s built-in flash is small, close to the lens and harsh; it flattens a product and throws a hard shadow directly behind it. Window light alone, even on a grey day, almost always looks better.
- Grid on. Most camera apps have a three-by-three grid in settings. It makes it obvious when a product or the edge of the card is drifting off level.
- Tap to focus, and hold to lock the exposure on the product itself, not the bright window behind it. Locking the exposure stops the camera from re-metering and darkening the shot every time something in the frame changes.
- Do not use the zoom. Past 1x, most phones are scaling the image digitally rather than optically, which softens exactly the fine edges, threads and labels a close shot is meant to show. Move the product or the phone closer instead.
- Brace the phone. A small tripod is ideal, but a stack of books, a shelf edge or leaning against a wall works. Indoor light is dim enough that a handheld shot often comes out a little soft without anyone noticing until it is on a screen at full size.
- Turn off Portrait mode. Portrait or bokeh modes blur whatever the phone guesses is background, based on a rough depth estimate rather than a precise edge. That guess is frequently wrong right at the product’s own outline, a strap, a handle, fine text, and a background remover then has to make sense of an edge the phone has already softened. Shoot in the ordinary photo mode and let the cutout step, which works from the real pixels, decide what is background.
A note on reflective, dark and clear products
Most products photograph fine against a card, in window light, with nothing special. A few materials are worth planning for before you shoot rather than after:
- Shiny or reflective surfaces, polished metal, glossy ceramic, glass, tend to mirror the window itself as a bright rectangle. Move the product slightly off the direct line to the window, or angle it a few degrees, until the reflection moves off the surface you care about rather than trying to eliminate it entirely.
- Very dark products can lose detail into their own shadow. A little extra fill, a second card bounced in from the side left in the earlier lighting step, brings back texture without changing the product’s colour.
- Glass, clear plastic and anything you can see through is the one case worth shooting on the real background rather than fixing afterwards. A cutout removes what is behind a product, but it cannot remove what shows through it: a clear bottle photographed over a patterned card keeps that pattern’s colours inside the glass even once the surrounding card is gone. Shoot these directly against the white sweep, lit so the sweep itself reads brightly through the product, and there is nothing behind it for the cutout to need to fix.
The shots to take
One photo rarely covers what a buyer wants to see. A short, repeatable set does:
- A straight-on hero shot, product centred, camera level with it. This is the one most marketplaces treat as the main image.
- A three-quarter angle, camera slightly above and to one side, for anything with height or a visible top surface: a bottle, a box, a mug.
- A close-up of the detail that matters: a label, a texture, a seam, a hallmark. Buyers zoom in on exactly the part a wide shot glosses over.
- A flat, parallel shot for anything meant to lie flat. Clothing on a hanger, a print, a flat lay of jewellery: shoot straight on rather than at an angle, or the item reads as tapered or distorted.
Check the shot before you cut it out
- Open the photo at full size on a laptop or a large phone screen, not the thumbnail in the camera roll.
- Zoom in on the product’s edge and on any fine texture, a label’s small text or a fabric weave.
You should see: a crisp edge and readable detail at full zoom.
If you do not: softness from camera shake or a missed focus point. Retake it braced against something solid, tapping directly on the product to focus before the shot.
The cutout, which is what actually fixes the background
This is the step that turns a card that merely looks reasonably clean into a background that is exactly what a marketplace or a store asks for.
The free way
Any product photo, onto pure white or any colour, at full resolution
Drop the photo, check the edge against handles, straps or any gap in the compare view, then choose White (or another colour) and download. getPNG keeps every pixel of the original photo, so a 24 megapixel shot comes back at 24 megapixels, and nothing about the picture is uploaded anywhere to do it.
Once the product is cut out, product photos on a white background covers exactly what each marketplace wants from there: pure white and sizing for Amazon’s main image, and the looser rules for Etsy, eBay and Shopify. Amazon product image requirements goes further into that one marketplace’s specific rules, including the 85 percent framing guideline and the reasons a listing gets its image suppressed.
Keep the transparent cutout as well as the flattened version. A transparent PNG is the master you go back to for a different marketplace, a banner or a size change later, without reshooting.
What usually goes wrong
- Mixed lighting, a lamp left on alongside window light, giving the background an uneven colour a background remover then has to guess its way around.
- A creased backdrop, which shows as a visible line however clean the rest of the photo is.
- Zooming instead of moving closer, which softens exactly the detail a buyer wants to check.
- A handheld shot in dim light, soft enough that it only becomes obvious once it is on a screen rather than a phone’s camera roll.
- Shooting one angle only. A single hero shot is fine for a quick listing, but a buyer who cannot see a second angle or a close-up is more likely to ask a question or not buy at all.
If a photo still falls short once the setup is right, product photography setup covers which cheap upgrade fixes which fault, and in what order each is worth buying. A mirror is the one product this setup does not cover, because the glass reflects the person holding the camera, and how to photograph a mirror to sell shows the angle that keeps you out of it. A painting or a print is the opposite case, a flat surface where the camera has to stay square and the light has to be even, and how to photograph artwork covers that setup. Food is the product that will not wait, with a light, an angle per dish and a clean plate to get right before it cools, and how to take pictures of food goes through them. Clothing is the product with no shape of its own, which is why a garment needs ironing, padding and a camera held square above it, and flat lay clothing photography covers that. Jewellery is the opposite problem, a small and shiny piece that mirrors the room, and how to take pictures of jewellery covers the soft light and the ground it needs. Shoes are the product that has to be seen from every side, and how to take pictures of shoes covers the angles a buyer expects and the surface they sit on. Nails are the product that is a hand, a small curved surface at the end of a moving finger, and how to take pictures of nails covers the pose, the light and the distance that keep the whole nail sharp.
None of this needs a studio. It needs one good light, a background that is merely close enough, a few careful settings, and a cutout step that does the part a camera alone cannot: putting the product on a background that is not just clean, but exact.
The steps, in short
- Set up the light. Near a large window, out of direct sun, with any curtain sheer enough to soften it. Turn off other lights in the room so only one colour of light hits the product.
- Build a seamless background. Tape or clamp a large sheet of white card so it curves from the wall onto the surface with no crease. A card that contrasts a little with the product, rather than matching it exactly, is easier to cut out cleanly.
- Set up the phone. Flash off, grid on, tap the product to focus and lock the exposure there. Steady the phone against something solid or on a small tripod.
- Shoot several angles. A straight-on hero shot, a three-quarter angle, and a close-up of any texture, label or detail a buyer would want to check.
- Cut it out and place it on the right background. Remove the background, check the edges in the compare view, then place the product on pure white or whatever background the destination wants, at the photo's full resolution.
Questions
Do I need a lightbox or a proper studio to take product photos?
No. A large window is a bigger, softer light source than most lightboxes, and it is free. A lightbox earns its cost once you are shooting every day and cannot depend on the weather, but the setup in this guide, a window and a sheet of card, produces a usable photo for a single listing or a small shop.
Why does my white card look grey or yellow in the photo?
Two separate things cause this. A camera exposes for the whole scene, so even a genuinely white card usually records as light grey rather than 255, 255, 255. And if a lamp is on as well as the window, the card picks up a colour cast where the two lights overlap, because daylight and a bulb are not the same colour of white. Turn off the other lights, and do not worry about the grey: cutting the product out and placing it on a true white afterwards fixes both at once.
Should I zoom in with my phone to get closer to the product?
Move the phone or the product instead. Most phones apply a digital zoom past 1x or 2x that scales the image up and loses detail, exactly the softness a background remover then has to work with at the edge. Physically closer keeps every pixel real.
What angle should a product photo be shot from?
A straight-on, eye-level shot reads most naturally for most products and is what marketplaces expect for a main image. A slightly raised three-quarter angle adds depth for anything with a visible top, like a box or a bottle. Flat items meant to be seen flat, clothing on a hanger or artwork, are the exception: shoot those parallel to the item, not at an angle, so it does not look tapered.
Do I need a tripod?
Something steady is what matters, not a tripod specifically. A phone braced against a stack of books, a shelf or a wall works. Indoor light, even good window light, is dim enough that handheld shots often come out slightly soft, and that softness is much harder to fix afterwards than a wobble is to prevent.
Should the background already be white, or does the cutout handle that?
The cutout handles it. Getting a card to read as true white straight out of the camera means overexposing, which also washes out a pale product. It is easier to shoot a background that merely contrasts with the product, then remove it and place the product on exactly 255, 255, 255 afterwards, at the photo's original resolution rather than a resized copy.