Short answer
The safest headshot background is mid grey: it contrasts with every hair colour and most clothes, and looks the same on light and dark pages. Muted blue reads calm and corporate, white suits white company websites, and black is dramatic but swallows dark hair. Choose by contrast with your hair and clothes first, then by where the photo will appear. You can swap an existing background for free if you check the hair edge.
A headshot background has one job: make your face the first thing anyone sees, at any size, on any page. The colour matters more than people expect, because it decides whether your hair has an outline, whether your jacket merges into the frame, and whether the photo looks at home on a company website or sticks out. This guide compares the usual choices (grey, blue, white, black, a soft office blur) by what they do with different hair and clothing, says which one to use where, and shows how to change the background of a headshot you already have without it looking pasted on.
The best background colour for a headshot: contrast first, destination second
Two questions decide the colour, in this order.
1. What separates from your hair and clothes? The outline of your head and shoulders is what makes a headshot readable at 40 pixels. Dark hair needs a background lighter than it; light hair needs one darker than it. A navy jacket on navy disappears; a white shirt on white does too.
2. Where will the photo live? A team page with a white layout, a LinkedIn circle that appears in light and dark mode, a conference programme on a coloured brand page, a printed brochure. The background should either blend with that page on purpose or contrast with it on purpose, never nearly match it by accident.
Everything else (mood, brand colour, fashion) comes after those two.
Headshot background colours compared
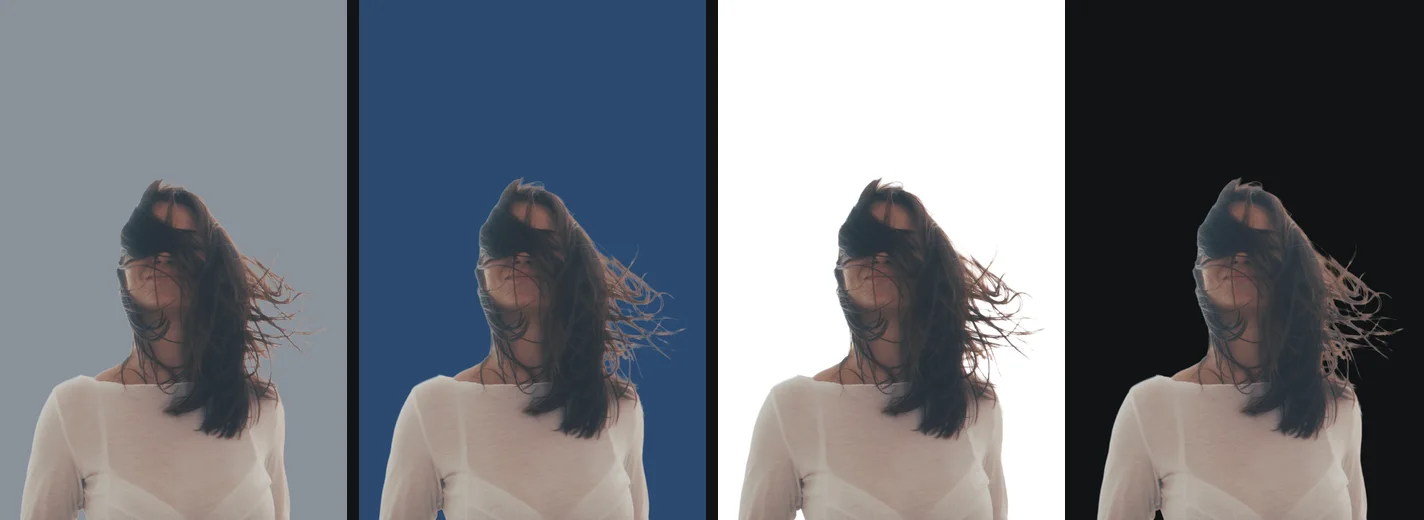
| Background | Works best with | Watch out for | Good for |
|---|---|---|---|
| Mid grey | Almost everyone | Looking flat if the photo is dull | LinkedIn, team pages, press kits |
| Blue or blue grey | Warm skin tones, dark or light clothing | Saturated blue tinting skin | Corporate, finance, legal, tech |
| White or off-white | Dark hair, dark clothes | Light hair and white shirts vanishing; edge faults showing | White-page company sites, catalogues |
| Black or charcoal | Light hair, light clothes | Dark hair and dark jackets merging | Creative, speaker, dramatic portraits |
| Brand colour, muted | Consistent team sets | Clashing with clothes | Company sites with a strong palette |
| Soft office blur | Large photos, approachable tone | Busy at small sizes, dates quickly | About pages, recruiting pages |
Grey: the safe default
Grey is the studio default for a reason. A mid grey sits between the darkest hair and the lightest shirt, so almost every outline stays visible. It also looks the same in a platform’s light and dark modes, which matters now that most apps have both. If you want one colour for a whole team, choose grey.
The risk is flatness. A grey background with grey lighting and a grey suit is a very grey picture. A slightly warm grey (a touch of beige in it) keeps skin looking healthy, and a gentle gradient, lighter behind the head and darker at the edges, adds depth that photographers normally create with a light on the backdrop.
Blue: calm and corporate
Blue reads as trustworthy and steady, which is why banks and law firms like it. Keep it muted: a slate or steel blue rather than a bright royal blue. Strong blue reflects onto the skin in a real studio and, in an edited photo, makes the face look slightly orange by contrast. Blue is also a good choice for warm-toned photos, because it sets off warm skin without clashing.
White: clean, but unforgiving
A white background makes a headshot look like part of a white web page, which is sometimes exactly what a company wants. It is also the least forgiving colour. Light hair loses its outline, white or pale shirts merge into the frame, and any fault in a cutout shows immediately: a grey fringe from the old background, a missing strand, a pale halo. If you choose white, prefer an off-white (#F4F4F2 or similar) and check the edges at full size.
Black or charcoal: dramatic
Dark backgrounds suit creative fields and speaker profiles, and they flatter light hair and pale clothing. They swallow dark hair and dark suits, turning head and shoulders into one shape with a face floating in it. Charcoal (#2B2D30 or similar) keeps a little separation that pure black does not.
Soft office blur
A blurred office or window behind you says “at work” and feels less formal than a plain colour. It hides small edge problems well, because a blurred scene has no hard line for a fault to show against. It is harder to do convincingly as an edit: the blur should match the depth of field of the photo, and the light in the scene should come from the same side as the light on your face.
getPNG does not blur backgrounds. To build this look from a cutout, put the transparent PNG over a blurred photo of an office in an editor such as Photopea or GIMP, and blur that photo more than you think you need.
Matching the background to hair colour
Hair is the edge that makes or breaks a headshot, so it deserves its own list.
- Black or dark brown hair: light or mid grey, off-white, light blue. Avoid black and charcoal.
- Mid brown or red hair: mid grey, blue grey, soft green. Avoid orange and warm browns close to the hair colour.
- Blond hair: mid grey, slate blue, charcoal. Avoid white, cream and pale yellow.
- Grey or white hair: mid to dark grey, navy, dark green. Avoid white and pale grey.
- Shaved head or very short hair: anything with contrast against the skin tone; the outline is the head itself.
Clothing follows the same rule. A black jacket wants a mid or light background; a white shirt wants a mid or dark one. If you have a light shirt and dark hair, mid grey is the answer that keeps both.
How to change the background of a headshot
If the photo is good and only the background is wrong, a cutout on a new colour is quicker and cheaper than a reshoot. The steps below keep the full resolution of the original, which matters for a headshot that might be printed.
1. Use the original, full-size photo
Take the file straight from the photographer or the phone. Copies sent through messaging apps or downloaded from a social network are smaller and more compressed, and the compression damage sits exactly at the edges of hair.
2. Remove the background
Drop the photo on getPNG. The model finds you, and the edge is refined against the full-size photo with a guided filter, so the outline follows the real pixels of your hair instead of an enlarged, blurry mask. The result is a transparent cutout at the resolution you started with.
3. Try colours
Pick a background colour. The preview shows the cutout on that colour immediately, so trying grey, blue grey and charcoal takes seconds. Zoom out to thumbnail size for each one, because that is where most people will see it.
4. Check the hair and shoulders in the compare view
The compare view shows the original beside the cutout with a divider you can drag. Move it slowly across the hair. Look for:
- A pale or dark rim around the head. That is colour from the old background left in the edge pixels. Pull the outline in by one or two pixels with Edge shift. The guide to a white halo around a cutout explains where it comes from.
- An edge that looks cut with scissors. Add a little Feather so the outline blends into the new colour.
- Missing strands. Soft, semi-transparent hair is kept as soft pixels rather than thresholded into hard ones, which is why it looks natural. A strand that was blurred into a busy background may still be lost; that is the honest limit of any automatic cutout.
5. Export for the destination
- For a profile (LinkedIn, Slack, email): JPG on your colour. Small file, looks the same everywhere. The LinkedIn profile picture guide has LinkedIn’s size limits.
- For a web designer or a brochure: a transparent PNG, so the designer can place you on the page colour or a gradient themselves.
- For a website where file size matters: WebP with transparency, or WebP on the colour.
The free way
Try five background colours in a minute
Drop the headshot on getPNG, click through grey, blue and charcoal behind you, check the hair in the compare view, and save a JPG or a transparent PNG at the full size of the original.
A headshot is a clear photo of a face, and it is worth knowing where it goes when you edit it. Most online background removers upload the photo to a server; getPNG processes it in the browser and it is never sent anywhere. The guide on whether it is safe to upload photos online compares what the popular tools say in their own policies.
Compare two backgrounds at real size
- Export the same cutout twice: once on mid grey, once on the colour you are tempted by.
- Put both files side by side and shrink the window until each photo is about 60 pixels wide.
- Look at the outline of the hair and shoulders in each.
You should see: one of the two keeps a clear outline around your head and shoulders at that small size; that is the one to use.
If you do not: if both lose the outline, your hair or clothes are too close to both colours; move further from them in brightness, lighter or darker.
Team headshots: one background for everyone
A page of team photos taken on different days, in different rooms, looks messy. Replacing every background with the same colour is the fastest way to make it a set.
- Choose one exact colour and write down its hex value. “Grey” is not a specification;
#9EA3A8is. - Keep the crop consistent. Same head size, same space above the head, same shoulder width in frame. getPNG keeps the original dimensions and has no crop, so do the crop in your editor or website builder afterwards.
- Match the light roughly. A photo lit from the left beside one lit from the right is noticeable in a grid even on identical backgrounds. If you can choose between photos, choose ones lit from the same side.
- Process each photo separately. getPNG handles one picture at a time; there is no batch mode.
When a new background will look fake
An edited background is convincing when three things agree: the edge, the light and the colour spill. Watch for these:
- Lighting that fights the colour. A face lit by warm indoor light on a cold blue background looks wrong even when the edge is perfect. Choose a warmer background, or warm grey.
- Colour spill on skin. A person photographed in front of a green hedge has a faint green tint on the side of the face and neck. Put them on grey and the tint shows. A background slightly in the direction of the old colour hides it.
- Very fine flyaway hair on a contrasting colour. The semi-transparent edge still carries some of the old background. Moving to a colour of similar brightness to the original helps more than any slider.
- Objects touching you. A chair back, a hand on your shoulder or a microphone may stay in the cutout. getPNG has no brush to remove an area by hand yet, so remove it in an editor afterwards, or choose another photo.
If a swap still looks wrong after trying a couple of colours, the fastest fix is often a new photo: stand about a metre in front of a plain wall, face a window, and ask someone to take it with the rear camera. Standing away from the wall keeps your shadow off it, and the window gives soft, even light. For more on picking backgrounds by destination, including product photos and ID photos, see photo backgrounds for every use.
The steps, in short
- Decide where the headshot will be used. A team page, LinkedIn, a speaker profile or a press kit. The page it sits on decides whether the background should blend in or stand out.
- Pick a colour by contrast. Compare your hair and clothes with the candidates: light hair needs a mid or dark background, dark hair a light or mid one, and your top should not match the background.
- Remove the old background. Drop the original photo on getPNG. The cutout comes back at the full resolution of the photo.
- Try colours behind the cutout. Pick a colour and the preview updates at once. Try two or three and compare them at thumbnail size.
- Fix the hair edge. Use the compare view to check hair and shoulders; pull in a halo with Edge shift and soften a hard edge with Feather.
- Export in the format the destination wants. JPG on the colour for most profiles, a transparent PNG only when a designer will place you on the page.
Questions
What colour background is best for a professional headshot?
Mid grey is the most forgiving: it separates from blond, grey, brown and black hair and from both white shirts and dark jackets. Blue grey is a close second. White and black work, but each hides one hair colour or one type of clothing.
Should a headshot background be white or grey?
Grey, unless the photo sits on a white web page where the company wants people to look cut out. White makes light hair and white shirts disappear at the edges and shows every fault in a cutout; grey hides small edge problems and still looks clean.
Is a blurred office background better than a plain one?
It says 'at work' rather than 'in a studio', and it hides small edge problems well. It also dates quickly and competes with the face at small sizes. For a small circle on LinkedIn or Slack, plain usually reads better; for a large photo on an About page, a soft office blur can feel warmer.
Can I change my headshot background myself without it looking fake?
Yes, if the lighting on you roughly matches the new colour and the hair edge is checked. A warm-lit photo on a cold blue background looks pasted on; a warm grey does not. Look at the edge of the hair at full size before you save.
What background colour should I use if I have blond or grey hair?
A mid to dark background: mid grey, slate blue, dark green or charcoal. Light hair against white or pale grey loses its outline, and fine strands vanish completely at thumbnail size.
Do team headshots need the same background?
They look much better that way. Pick one colour, write down its hex value, and put every person's cutout on exactly that colour, so a grid of faces reads as one set even if the photos were taken months apart.