Short answer
To remove a background in PowerPoint, select the picture and choose Picture Format > Remove Background. PowerPoint colours the background magenta. Use Mark Areas to Keep and Mark Areas to Remove to correct it, then click Keep Changes. To reuse the cutout elsewhere, right-click it and choose Save as Picture, then save as PNG so the transparency stays. It works in the Windows and Mac desktop apps, not on SVG or other vector pictures.
To remove a background in PowerPoint, select the picture and click Remove Background on the Picture Format tab. PowerPoint guesses which part is background, shows it in magenta, and lets you correct the guess by drawing lines over what to keep and what to remove. When you click Keep Changes, the background is transparent on the slide. It is one of the most useful tools in Office that most people never find, and it also has limits you will hit quickly on hair, similar colours or a busy background.
This guide covers the steps on Windows and Mac, how to fix a wrong guess, how to get the cutout out of PowerPoint as a transparent PNG, and what to do when the result is not good enough. Steps checked against Microsoft’s support pages for PowerPoint for Microsoft 365, PowerPoint 2024 and PowerPoint 2021 in September 2026.
Where Remove Background is, and where it is not
Microsoft’s help page lists the tool in PowerPoint, Word, Excel and Outlook for Microsoft 365 on Windows and Mac, and in the 2021 and 2024 versions. The steps are the same in each app, so what you learn here also works in making a picture transparent in Word.
Two places it will not help:
- Vector pictures. Microsoft says background removal is not possible for SVG, Adobe Illustrator (AI), Windows Metafile (WMF) and DRW graphics, and the button is greyed out for them. That includes PowerPoint’s own Icons, which are SVG.
- PowerPoint in a browser. Microsoft’s Remove Background help covers only the desktop apps, and its page on picture transparency says that setting is not available in Microsoft 365 for the web. If you are working in a browser and do not see the tool, open the file in the desktop app with Editing > Open in Desktop App.
How to remove a background in PowerPoint
- Insert the picture. Insert > Pictures, then choose where it comes from. A photo pasted from a web page works too.
- Select it. Click the picture once. The Picture Format tab appears at the right of the ribbon. If it does not, double-click the picture.
- Click Remove Background. It is at the far left of the Picture Format tab (in some Mac versions the tab is called Format). In current Microsoft 365 versions on Windows it is a menu with two choices, AI-assisted and Manual editing; choose Manual editing for the steps below (the AI-assisted editor is described further down). A new Background Removal tab opens, and the picture changes: the parts PowerPoint plans to remove turn magenta, and the parts it plans to keep stay in their normal colours.
- Look closely before you do anything else. Zoom in (the zoom slider is at the bottom right of the window). The first guess is often good for a clear subject on a plain background and often wrong at the edges: a shoulder turned magenta, a patch of wall left in its real colour.
- Mark areas to keep. If part of the subject is magenta, click Mark Areas to Keep. The pointer turns into a pencil. Draw a short line across the part that should stay. You do not need to paint the whole area: a stroke across it tells PowerPoint “this colour region belongs to the subject”, and it recalculates.
- Mark areas to remove. If part of the background is still in colour, click Mark Areas to Remove and draw a line across it.
- Keep the changes. Click Keep Changes, or click anywhere outside the picture. Discard All Changes puts the picture back exactly as it was.
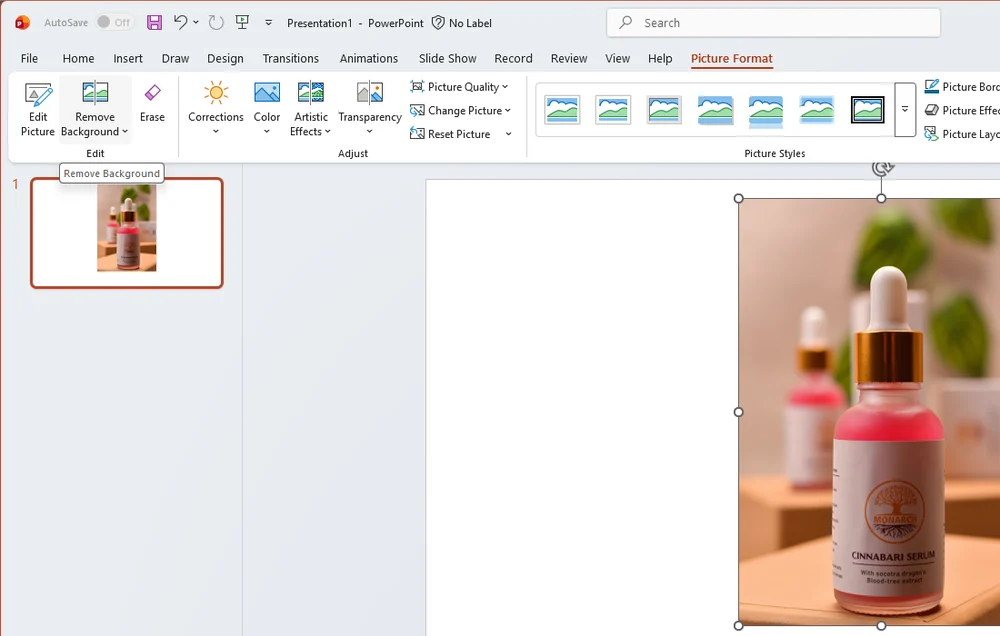
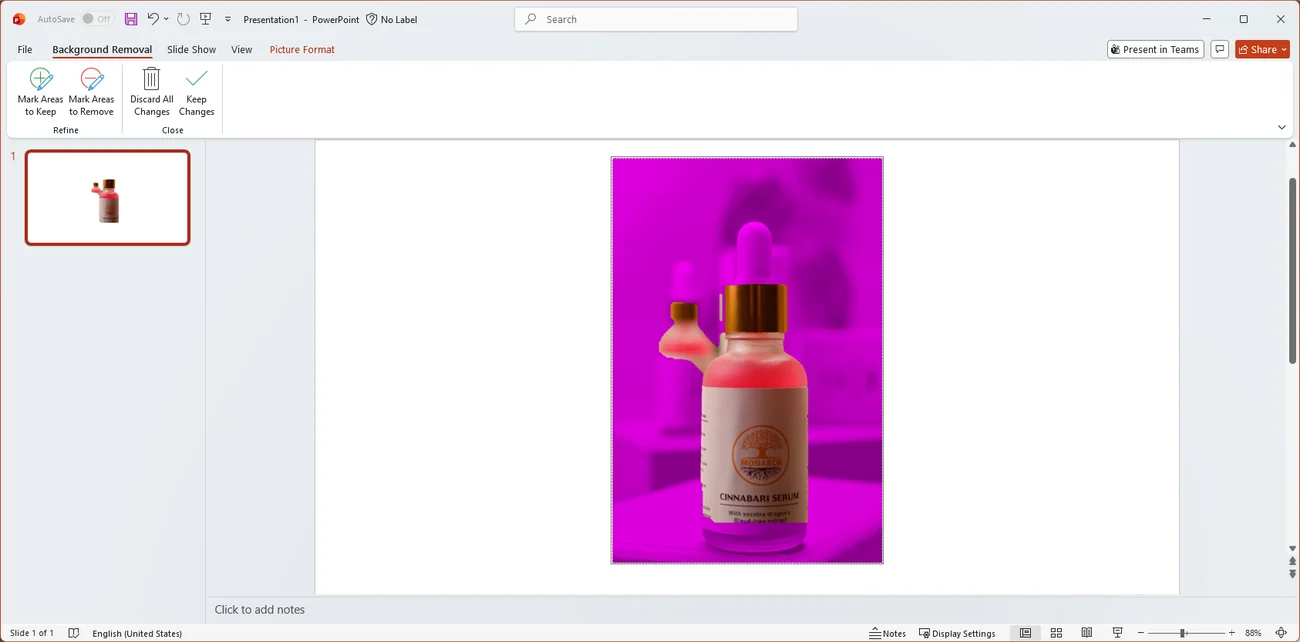
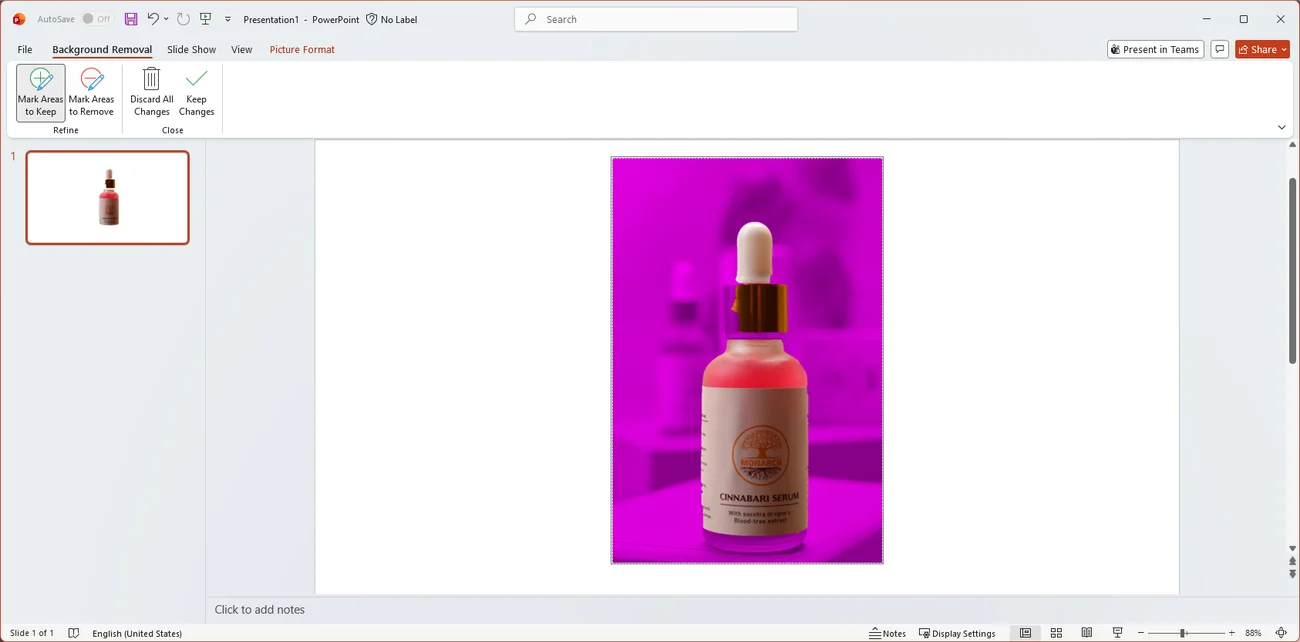
The background is not deleted, only hidden, so you can come back later: select the picture, click Remove Background again, and the magenta view comes back so you can adjust it.
Getting the marks right
The pencil lines are hints, not a brush, and the tool responds best to a few confident strokes rather than many little ones.
- Draw across, not around. A line across the middle of a missing sleeve works better than tracing its outline.
- Start with the biggest mistake. Fix the large wrong areas first, then look at what remains. Each mark changes the whole calculation, so small errors often fix themselves.
- Undo a bad mark with Ctrl + Z (Command + Z on a Mac) while the Background Removal tab is still open.
- Crop first. If the subject is small in a big photo, crop the picture to the subject before removing the background. Less background means fewer wrong guesses.
Saving the cutout as a transparent PNG
A picture with its background removed only lives on the slide until you save it as a file. To use it in a document, an email signature, a website or another presentation:
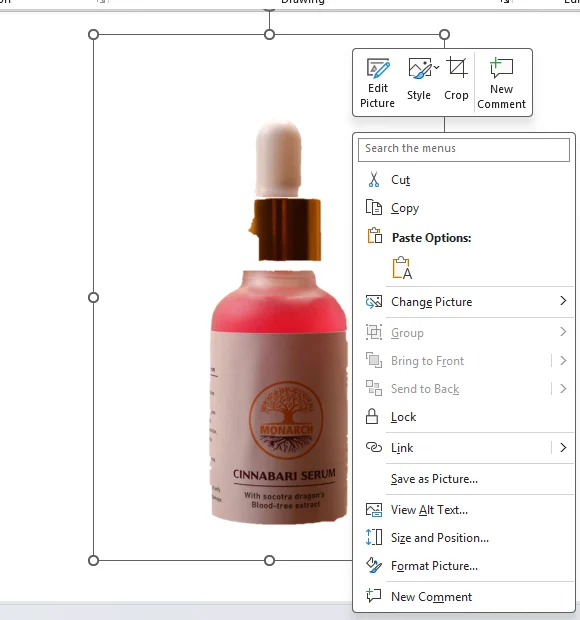
- Right-click the picture.
- Choose Save as Picture.
- In Save as type (Windows) or the format list (Mac), choose PNG.
- Name it and save.
PNG keeps the transparent area. JPEG has no transparency at all, so a cutout saved as JPEG gets a solid background back, usually white. Why a PNG shows a black or white background covers the other ways transparency gets lost after the file leaves PowerPoint.
Check that the saved PNG is transparent
- Insert the PNG you just saved onto a new slide.
- Right-click the slide, choose Format Background, and pick a dark solid fill.
You should see: the dark colour right up to the outline of the subject, with no white box around it.
If you do not: the picture was saved as JPEG. Go back to the original, choose Save as Picture again, and pick PNG. If the edges show a thin light outline instead of a box, that is a halo from the old background, covered further down.
Keep the resolution
PowerPoint compresses pictures to keep presentations small, and by default that can reduce a large photo when you save the file. If the cutout will be used anywhere bigger than a slide, change this before you start: File > Options > Advanced, then under Image Size and Quality tick Do not compress images in file and set Default resolution to High fidelity. Microsoft’s own description of the setting is plain about the trade: it keeps picture quality at the cost of a larger file.
Other ways to make part of a picture transparent in PowerPoint
Remove Background is not the only transparency tool on the Picture Format tab, and for some pictures another one is better.
| Tool | Where | What it does | Good for |
|---|---|---|---|
| Remove Background | Picture Format > Remove Background | Hides the background, with marks to correct it | Photos of people, products, objects |
| Set Transparent Color | Picture Format > Color > Set Transparent Color | Makes one exact colour transparent | Logos and clip art on a flat colour |
| Transparency | Picture Format > Transparency | Fades the whole picture, 0 to 100 percent | Backgrounds and watermarks, not cutouts |
| Crop to Shape | Picture Format > Crop > Crop to Shape | Clips the picture to a circle or other shape | Round headshots, framing |
Set Transparent Color is the quickest way to drop the white behind a logo: click it, then click the white. It has a catch that Microsoft spells out: it makes exactly one colour transparent, and areas that look like one colour are often many slightly different ones. A logo saved as a compressed JPEG has a soft band of almost-white pixels around every edge, and those stay behind as speckles. It works well on a clean PNG or a screenshot of flat artwork, and poorly on a photo.
Transparency is not a background remover at all. It fades the whole picture, subject included, so the slide shows through everything. It is the right tool for a faint photo behind a title, and the wrong one when you want the subject solid and the background gone.
Does PowerPoint upload the picture?
Microsoft’s help page does not say where Remove Background does its work. It has been in the desktop apps for well over a decade, long before cloud AI features arrived in Office, and it behaves like a local tool. You can check it yourself on your own computer: switch off Wi-Fi, open a presentation saved on the computer, and remove a background. If it works with no connection, nothing was sent.
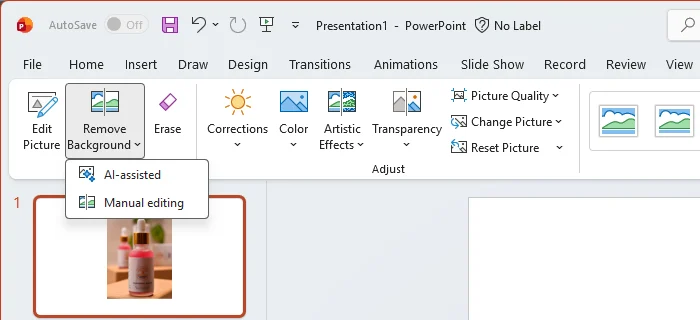
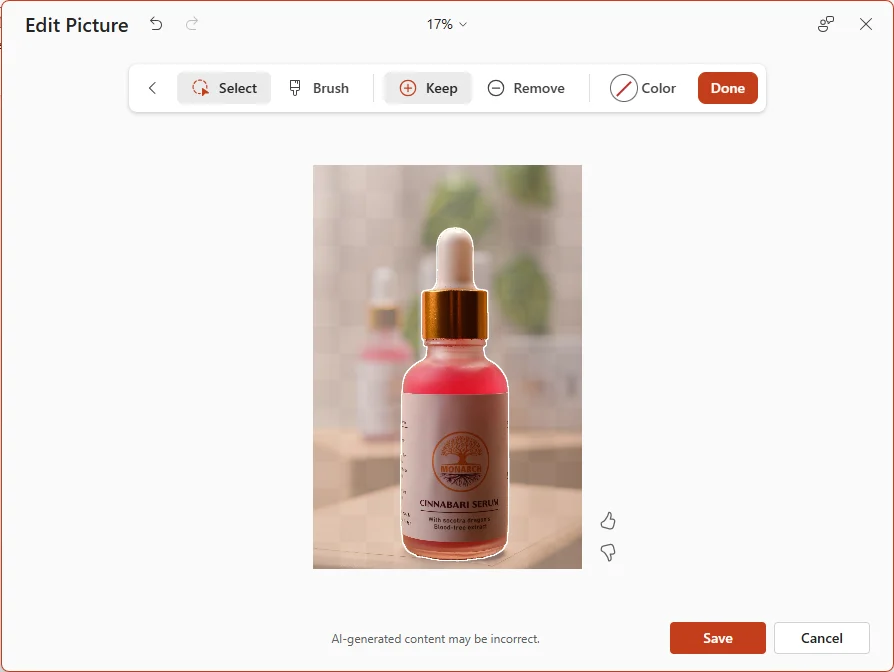
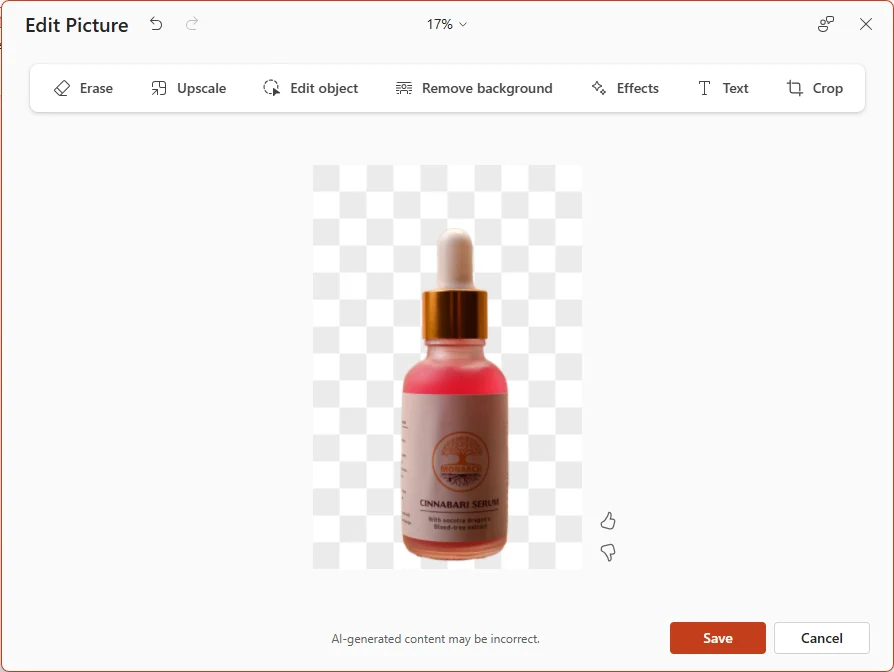
The AI-assisted choice is a different tool. It opens an Edit Picture window from Microsoft’s Designer editor, with Select, Brush, Keep and Remove, and the note that AI-generated content may be incorrect. Microsoft announced it in December 2025 (Message Center MC1187787) as switched on by default, with usage limited by capacity for business accounts without a Copilot licence and by monthly credits for personal accounts. That announcement does not say where the picture is processed, and neither does the help page. A tool that counts credits and runs inside a web view is likely to use Microsoft’s online service, so for a photo you would rather keep on your computer, choose Manual editing, which is the classic tool described above.
What does leave the computer is the presentation itself when it lives in OneDrive or SharePoint, as many Microsoft 365 files do: the pictures in it are stored there too. For photos you would rather keep on your own machine, save the file locally. The wider question of which online tools see your pictures is covered in is it safe to upload photos online.
When PowerPoint’s remove background does not work
The tool is a real help for a clear subject on a plain background. These are the cases where it struggles, and what to do about each.
Hair and fur. The result is a hard edge that cuts through loose hair, or a halo of background left around it. There is no refine-edge step in PowerPoint to fix that.
Subject and background in similar colours. A beige jumper against a beige wall, a black cat on a dark sofa. The marks help a little; often the tool cannot find a boundary that is not there in the colours.
A light outline around the subject. When the old background was bright, some of its colour is mixed into the edge pixels, and it shows as a thin pale line against a dark slide. The white halo around a cutout explains why, and how to remove it in different apps.
Many pictures. Each one is select, remove, mark, keep, save. For a team page with twenty headshots that is a long afternoon.
The button is missing. You are in the web version, the picture is an SVG or icon, or nothing is selected. See the first section.
For any of these, the practical fix is to cut the picture out with a better tool first and insert the result as a PNG that is already transparent. PowerPoint shows the transparency of an inserted PNG, so the cutout sits on your slide design with nothing behind it.
The free way
A cleaner cutout, then Insert > Pictures
Drop the photo on getPNG and download a transparent PNG at the full resolution of the original, with the edge refined against the full-size picture. Edge shift pulls the outline in by a pixel or two to lose a pale fringe, and Feather softens a hard edge. If the slide needs the photo on a brand colour instead, pick the colour and save a JPG or PNG on it.
PowerPoint, Google Slides and the rest
If your team uses Google Slides as well, the story there is different: its own Remove background command is tied to paid Gemini plans, and the free Opacity slider fades the whole picture. Removing a background in Google Slides covers both. For every other app, from Photoshop to Canva, removing a background in any app compares the built-in tools side by side.
The steps, in short
- Insert and select the picture. Insert > Pictures, then click the picture once so the Picture Format tab appears on the ribbon.
- Click Remove Background. Picture Format > Remove Background (Format > Remove Background in some versions). The area PowerPoint will remove turns magenta.
- Mark areas to keep. If part of the subject is magenta, click Mark Areas to Keep and draw a short line across that part with the pencil.
- Mark areas to remove. If part of the background kept its colour, click Mark Areas to Remove and draw a line across it.
- Keep the changes. Click Keep Changes. The background is now transparent on the slide, and Discard All Changes gives the original back.
- Save the cutout as a PNG. Right-click the picture, choose Save as Picture, and pick PNG in the file type list. JPEG would fill the transparent area with a colour.
Questions
Why is Remove Background greyed out in PowerPoint?
Either no picture is selected, or the picture is a vector file. Microsoft says background removal is not possible for SVG, Adobe Illustrator, WMF and DRW graphics, so the button is greyed out for them. Click the picture once, or double-click it, so the Picture Format tab opens. Icons and shapes are vectors too.
Can I remove a background in PowerPoint for the web?
Microsoft's help for Remove Background covers the Windows and Mac desktop apps only, and says picture transparency cannot be set in the web version either. If the button is missing in your browser, open the presentation in the desktop app with Editing > Open in Desktop App, or cut the picture out elsewhere and insert a transparent PNG.
How do I save a picture with no background from PowerPoint?
Right-click the picture after removing the background, choose Save as Picture, and pick PNG as the file type. PNG keeps the transparent area; JPEG does not have transparency, so it fills the removed background with a solid colour.
Why does my PowerPoint cutout have a white or black background in another app?
The file was saved as JPEG, or the app you put it in does not show transparency. Save it again as PNG. Some email clients, messaging apps and viewers also flatten transparency when they display or send a PNG.
How do I remove a white background from a logo in PowerPoint?
For a logo on a flat white background, Picture Format > Color > Set Transparent Color and a click on the white is often quicker than Remove Background. It removes one exact colour, so it works on clean flat artwork and poorly on photos or compressed JPEGs, which leave white specks around the edge.
Does PowerPoint make my picture smaller when it removes the background?
Removing the background does not, but PowerPoint compresses pictures in the file by default. Under File > Options > Advanced, in Image Size and Quality, tick Do not compress images in file and set Default resolution to High fidelity before you save a cutout you care about.