Short answer
To remove the background in Word or make a picture transparent in Word, select the picture and open the Picture Format tab. Transparency fades the whole picture (presets from 0 to 95 percent, or Picture Transparency Options for any value). Color > Set Transparent Color makes one colour clear, such as the white behind a logo. Remove Background hides the background of a photo and keeps the subject solid. All three need the desktop app; Word for the web cannot make a picture transparent.
To remove a background in Word, or make a picture transparent, select it and use the Picture Format tab, but first decide which kind of transparent you mean, because Word has three tools that do three different things. Transparency fades the whole picture so the page or text shows through it. Set Transparent Color makes a single colour disappear, which is how you drop the white square behind a logo. Remove Background hides the background of a photo and leaves the person or product solid. Pick the wrong one and you get a ghostly faded photo when you wanted a clean cutout, or a speckled logo when you wanted a faded watermark.
This guide covers all three, with the version each needs, why the logo trick leaves white spots, and the text wrapping setting that makes transparency actually visible. Steps checked against Microsoft’s support pages for Word for Microsoft 365, Word 2024 and Word 2021 in September 2026.
Which kind of transparent do you need?
| You want | Tool | Word version |
|---|---|---|
| A faded photo behind text, or a watermark | Transparency | Word 2021, 2024, Microsoft 365 |
| The white behind a logo gone | Color > Set Transparent Color | Word 2016 and later |
| A person or product without the background | Remove Background | Word 2021, 2024, Microsoft 365 (older versions have it too) |
| A faded picture in Word 2019 or 2016 | A shape filled with the picture | Word 2016 and later |
None of these work in Word for the web. Microsoft’s help says plainly that you cannot make a picture transparent in Word for the web, and that you need the desktop version on Windows or Mac. If you are in a browser, choose Editing > Open in Desktop App at the top of the ribbon.
Method 1: fade the whole picture with Transparency
Use this for a background photo behind a heading, a faint image on a cover page, or a logo as a soft watermark.
- Insert the picture. Insert > Pictures > This Device, and choose it.
- Select it. Click the picture once. The Picture Format tab appears on the ribbon; if it does not, make sure the picture itself is selected and not the text around it.
- Click Transparency. A gallery shows seven presets: 0, 15, 30, 50, 65, 80 and 95 percent.
- Pick one, or fine-tune. Choose Picture Transparency Options at the bottom of the gallery. The Format Picture pane opens on the right with a Transparency slider, from 0 (fully solid, the default) to 100 percent (invisible). You can also type a number.
This fades every pixel equally. The subject becomes as see-through as the background, which is right for a backdrop and wrong for a cutout.
In Word 2019 or 2016: the shape workaround
Older versions have no Transparency button for pictures, but shapes have always had a transparency setting. Microsoft’s workaround:
- Insert > Shapes, and choose a rectangle.
- Draw it with the same proportions as the picture.
- Right-click the shape, choose Outline > No Outline.
- Right-click again, choose Format Shape.
- In the Fill section, choose Picture or texture fill, click File (or Insert), and choose the picture.
- Drag the Transparency slider.
If the picture looks stretched, resize the shape, or use the Offset settings below the slider.
Method 2: make one colour transparent
This is the quick way to get rid of a flat background, usually the white box behind a logo that looks fine on a white page and ugly on a coloured one.
- Select the picture.
- Open Color. Picture Format > Color.
- Choose Set Transparent Color. The pointer changes shape.
- Click the colour to remove. Click on the white background. Every pixel of exactly that colour becomes transparent.
To undo it, Picture Format > Reset Picture in the Adjust group.
Why it leaves white specks around the edges
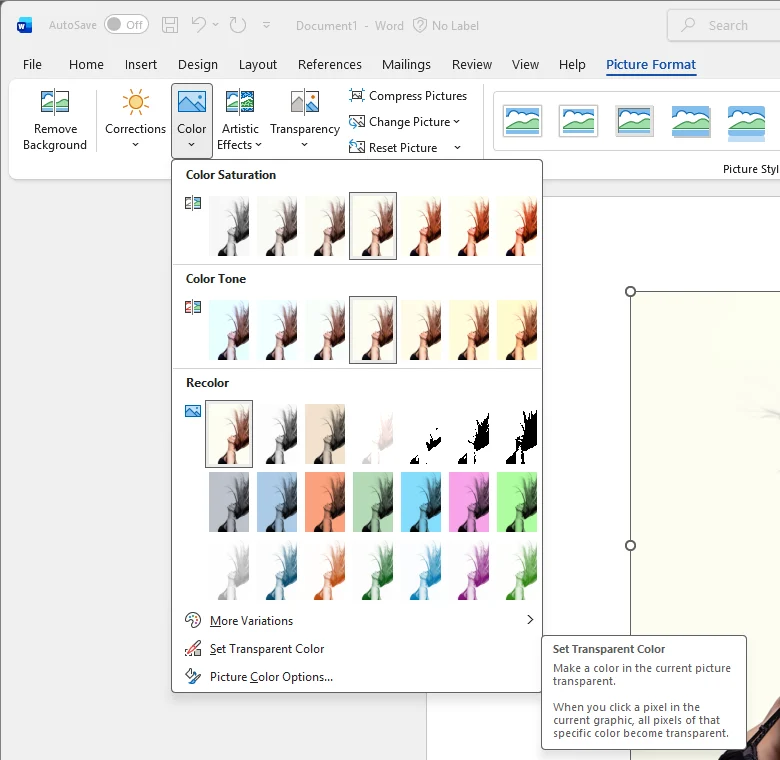

Microsoft’s help carries a warning about this tool, and it explains most complaints. Set Transparent Color removes one colour, and only one per picture: pick a second and the first comes back. Areas that look like a single colour are often a range of subtle variations.
That matters most for logos saved as JPEG. JPEG compression softens every edge into a band of almost-white pixels (a value of 250 or 247 instead of 255), and adds faint blocks of slightly different whites in flat areas. Set Transparent Color clears the exact white you clicked and leaves all the near-whites behind, so the logo ends up with a speckled, jagged fringe that shows badly on a dark page. Anti-aliased edges, where the logo’s colour blends into white over a pixel or two, cannot be handled at all: those pixels are neither logo nor background.
So Set Transparent Color works on clean, flat artwork: a PNG exported from a design program, a screenshot of a simple graphic, clip art. On a photo, a scanned logo or a small JPEG from a website, use Remove Background or start from a properly cut-out PNG. The white halo around a cutout goes further into why edges keep a trace of their old background.
Method 3: remove the background in Word
For a portrait, a product shot or anything that is not flat colour, Remove Background is the tool. It is the same one PowerPoint has, so if you have used it there, nothing changes.
- Select the picture.
- Click Remove Background. It is at the left end of the Picture Format tab. The part Word plans to remove turns magenta; the part it plans to keep stays in colour.
- Correct it. If part of the subject is magenta, click Mark Areas to Keep and draw a short line across it with the pencil. If part of the background is still in colour, click Mark Areas to Remove and draw across that.
- Click Keep Changes. Discard All Changes puts the picture back.
The button is greyed out for vector pictures. Microsoft lists SVG, Adobe Illustrator, WMF and DRW files as ones where background removal is not possible, and Word’s built-in Icons are SVG.
Marking areas takes some practice. Removing a background in PowerPoint has more detail on drawing marks that work, keeping the picture’s resolution, and saving the cutout as its own PNG with Save as Picture.
Make the transparency visible: text wrapping
A lot of “transparency is not working” questions are really about layout. A newly inserted picture is placed In Line with Text: it sits in the text like a very large letter, nothing can go behind it, and the only thing that shows through a transparent area is the white page. It looks exactly as if nothing happened.
- Click the picture.
- Click the Layout Options button that appears at its top right corner.
- Choose Behind Text (the picture goes under the text, good for a faded background) or In Front of Text (the picture floats over everything, good for a cutout placed over a coloured shape).
Now a coloured shape, a page colour or text underneath shows through the transparent parts.
Check the transparency in a minute
- Go to Design > Page Color and pick a dark colour for the page.
- Look at the picture you made transparent.
You should see: the dark page colour showing through the transparent areas: through the faded picture, or around the logo or subject with no white box.
If you do not: if a white box remains around a cutout, the picture itself still has a white background (Set Transparent Color missed the near-whites, or the file was a JPEG with a baked-in background). Use Remove Background instead, or insert a transparent PNG. Then set Page Color back to No Color.
Printing, PDFs and sending the document
Printing. Microsoft notes that transparent areas print in the colour of the paper. On white paper a transparent background and a white one look identical; the difference only shows on coloured paper or where the picture overlaps other content.
PDF. File > Save As and choosing PDF keeps what you see on the page, including anything showing through the transparent areas.
Copying the picture out of Word. A picture you made transparent in Word is transparent inside Word. Pasted into an email or chat, it may arrive with a white or black background, because many apps flatten transparency. Why a PNG shows a black or white background explains which apps do this. If you need the cutout elsewhere, right-click it, choose Save as Picture, and pick PNG.
Does Word upload the picture?
The three tools are part of the Word desktop app, and Microsoft’s help pages do not describe them as online features. The document itself is another matter: if it is saved in OneDrive or SharePoint, as many Microsoft 365 documents are, every picture in it is stored there too. For a photo you would rather keep on your own computer, save the document locally.
When Word is the wrong tool
Hair, fur and soft edges. Remove Background gives a hard edge with no refine step, which cuts through loose hair or leaves a halo of background.
Many pictures. A team page, a product catalogue or a set of headshots means repeating the steps for each one.
A logo that needs to be crisp at any size. A transparent picture is still pixels. For letterheads and signage, a vector version is better, and getSVG, our sibling site, turns a clean logo into one with PNG to SVG.
A signature. A photographed signature on paper needs the paper removed cleanly, not a single colour; getSVG’s guide to a signature as a transparent PNG covers exactly that.
For photos, the most reliable path is to cut the picture out before it goes into Word and insert a PNG that is already transparent. Word shows PNG transparency as soon as the wrapping allows it, and you keep the file for the next document.
The free way
Insert a picture that is already cut out
Drop the photo on getPNG and download a transparent PNG at the full resolution of the original, with the edge refined against the full-size picture. Edge shift and Feather adjust the outline in a fraction of a second. Then Insert > Pictures in Word and set Layout Options to In Front of Text.
If you also work in other apps, removing a background in any app compares the built-in tools, and what a transparent PNG is explains the checkerboard and the formats that keep transparency.
The steps, in short
- Insert the picture. Insert > Pictures > This Device, choose the picture, and click it once so the Picture Format tab appears.
- Fade the whole picture. Picture Format > Transparency, then pick a preset, or Picture Transparency Options to drag the Transparency slider from 0 to 100 percent.
- Or make one colour transparent. Picture Format > Color > Set Transparent Color, then click the colour in the picture to remove, such as a white background.
- Or remove the background. Picture Format > Remove Background. Correct the magenta area with Mark Areas to Keep and Mark Areas to Remove, then click Keep Changes.
- Set the text wrapping. Click Layout Options next to the picture and choose Behind Text or In Front of Text, so what is underneath can show through.
Questions
How do I remove the background from a picture in Word?
Select the picture, click Picture Format > Remove Background, correct the magenta area with Mark Areas to Keep and Mark Areas to Remove, then click Keep Changes. It needs the desktop app; to reuse the cutout elsewhere, right-click it and choose Save as Picture, then PNG.
How do I make a picture transparent in Word for the web?
You cannot. Microsoft's help says pictures cannot be made transparent in Word for the web, and you need the desktop version of Word on Windows or Mac. In the browser, use Editing > Open in Desktop App, or make the picture transparent before inserting it, as a PNG.
Why is there no Transparency button in my version of Word?
The Transparency button on the Picture Format tab arrived in Word 2021 and Microsoft 365. In Word 2019 and 2016, draw a shape, fill it with the picture using Format Shape > Fill > Picture or texture fill, and drag the Transparency slider there instead.
Why does Set Transparent Color leave white spots around my logo?
Because it makes exactly one colour transparent, and the white around a logo in a JPEG is really many slightly different near-whites. The ones that do not match stay. It works best on flat, clean artwork. For a photo or a compressed logo, use Remove Background, or start from a transparent PNG.
Can I make more than one colour transparent in Word?
No. Microsoft notes that you cannot make more than one colour in a picture transparent; in practice, clicking a second colour brings the first one back. For a picture with a gradient or a photographed background, use Remove Background or cut the picture out in another tool.
Why does my transparent picture still show a white box in Word?
Usually the text wrapping. With In Line with Text, the picture sits in a line of text and the page is all that shows through. Choose Behind Text or In Front of Text from Layout Options to see coloured shapes or text underneath. If a white box remains, the picture itself has a white background.
How do I print a picture with a transparent background from Word?
It prints as you see it. Microsoft notes that transparent areas take the colour of the paper when printed, and the colour of the background on screen. On white paper, a transparent background and a white one look the same; the difference shows on coloured paper or over other content.